第五章、容器
????? 一个容器就是处理一个servlet请求和封装web客户端的相应响应的一个模块。一个容器由org.apache.catalina.Container接口所具有,Tomcat有四种类型容器如:Engine、Host、Context、Wrapper。这章是讲解Context和Wrapper,剩下的两个容器在第13章讲解。这章以讨论Container接口作为开始,紧跟着就是讨论在容器中的管道机制。接下来就要谈论Wrapper和Context接口。两个应用程序总结这章,通过运用一个简单的wrapper和一个简单的context.
一、容器接口
? 一个容器一定要实现org.apache.catalina.Container。这如你在第四章看到的,你把Container实例传给Conector对象的setContainer()方法,目的是connector能够调用container的invoke()方法.让我们回想在第四章的Bootstrap类中的代码:
???????? HttpConnector connector=new HttpConnector();
???????? SimpleContainer container=new SimpleContainer();
???????? connector.setContainer(container);
第一件事要注意的就是在Catalina容器中有四个不同概念层次的容器:
?? 1)Engine?? 代表整个Catalina servlet engine
?? 2)? Host???? 代表一个含有一个或者多个的Context的虚拟host
?? 3)Context?? 代表一个Web应用。一个Context包含一个或者更多的wrapper
?? 4) Wrapper? 代表单个servlet
每个上面的容器在org.apache.catalina包中用接口来进行描述,这些接口的名字是:Engine、Host、Context、Wrapper。上面四个接口继承了Container接口。下面四个类StandardEngine、StandardHost、StandardContext、StandardWrapper标准的实现了这四个容器的接口,这四个类在org.apache.catalina.core包中
?
?? 下面的类图说明了Container接口、以及子接口还有他们的实现。注意整个接口在org.apache.catalina包中,其实现是在org.apache.catalina.core包中。
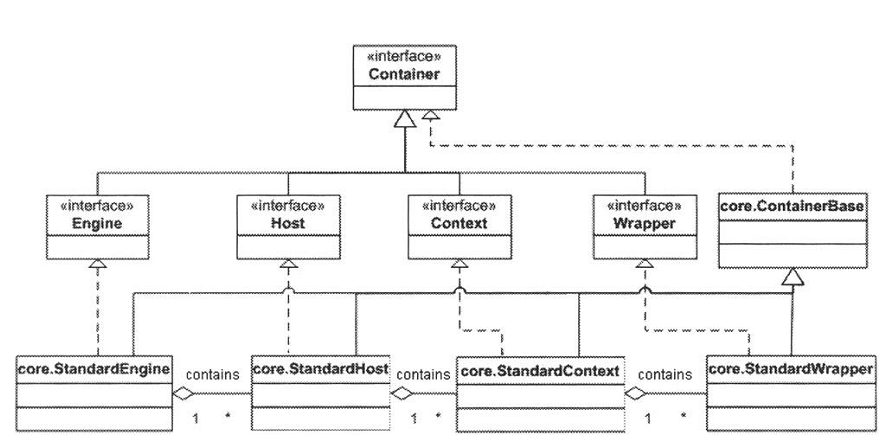
注意在上面的类图中,整个实现的类派生了一个抽象的类ContainerBase.
?
??? 一个可以运行的Cataline不需要完完全全的四种类型的容器。比如,在这章第一个应用程序的container模块仅仅是有一个wrapper组成。第二个应用的container模块是由一个Contect和一个Wrapper组成。这章是既没有Engine也没有host容器。
???? 一个容器有零个或者更多个孩子容器(要比这个容器的层次低)。例如,正常的一个Context有一个或者多个wrapper,一个Host有零个或者多个Context。然而,四个容器中层次最低的Wrapper容器不能包含有孩子容器。为了添加一个孩子容器给一个容器你要用Container接口的方法addChild,下面是是它的方法签名:
?????? public void addChild(Container child);
?? 如果要从一个容器中移除孩子容器,就需要调用Container接口的removeChild方法,下面是此方法的签名:
?????????? public void removeChild(Container child);
?? 除此之外Container接口也有寻找一个孩子和找出容器的所有孩子,下面是两个方法的签名:
??????????? public Container findChild(String name);
??????????? public Cotainer[] findChildren();
??? 一个容器也可以包含许多组件如:Loader、Logger、Manager、Realm、Resources。我们将会在下面的章节谈论这些组件。有一件值得注意的地方就是Container接口提供了get和set方法,目的是Container和这些组件进行关联。这些方法包括:getLoader、setLoader、getLogger、setLogger、getManager、setManager、getRealm、setRealm、getResources、setResources.
?
?????? 更有趣的是,Container接口被设计成一种可以用xml文件配置的方式,如:Tomcat管理员想要容器需要什么样的功能只需要在server.xml文件下进行配置就可以了。这种实现是引用了管道技术和一系列的阀门,这些技术将会在“管道任务”这段就行讲解。
????? 注意在Tomcat4中的Container接口与Tomcat5有一点点小的区别。比如:在Tomcat4中Container接口有一个map方法,但是在Tomcat5中此方法就没有。
二、管道任务
????? 这段主要说明:当connector调用了一个Container中的invoke方法将会发生什么事情。这段的又分为四个小部分,主要是讨论在org.apache.catalina包中的四个接口,Pipeline、Valve、ValveContext和Contained.
????? 一个Pipeline包含的任务就是容器的调用机制。一个Valve代表着一个具体的任务。在Container的pipeline中有一个基本的valve,而且你也可以添加你所需要的Valve(这个不包含基本的Valve).更令人惊奇的就是这些Valve能够在server.xml文件进行动态编辑。下面是pipeline和他的Valves:
????????? 如果你想了解servlet过滤器,你就需要想象一下pipeline和他的valves是怎么工作的。一个Pipeline就像一个过滤链,每个valve就是过滤门。想一个过滤器,一个valve能过处理request和response对象。valve完成处理之后,又可以调用pipeline中的一下一个Valve中去。注意这个基本的Valve一直是最后被调用。
?
????? 一个Container可以有一个Pipeline。当Container的Invoke方法被调用,Container就会传递给pipeline中的invoke方法进行处理,pipeline调用了第一个valve然后紧跟着调用下一个,如此类推,直到在pipeline中没有了Valve。因此你可以想象一下在pipeline中的invoke方式调用的伪代码,伪代码请看下面:
??????? //调用添加到pipeline中的valve
??????? for(int n=0;n<valves.length;i++){
??????????????? valve[n].invoke(...);
??????? }
//然后就调用the basic valve
??? basicValve.invoke(...);
???? 然而,Tomcat设计者选择了一个与众不同的方法就是在org.apache.catalina包中引用了ValveContext接口。在这里会详细说明他的工作原理。
????? 当connector调用了invoke()方法,然后调用pipeline中的valves,里面的代码不是十分的复杂。instead,the container 调用了pipeline中的invoke方法。the pipeline接口中的invoke方法的前面在下面,需要注意的就是此方法与the Container接口中的invoke方法是一模一样。
???? public void invoke(Request request,Response response)
?????????? throws IOException,ServletException;
下面的代码是org.apache.catalina.core.ContainerBase类实现了Container接口,并实现了invoke方法,代码如下:
?????? public void invoke(Request request,Response response)
?????????? throws IOException,ServletException{
??????? pipeline.invoke(request,response);
???? }
?? Pipeline实例在ContainerBase类中的实例变量中
?? 现在,the pipeline必须确保添加在pipeline中的valves和the basic valve一定要别调用。the pipeline创建了一个Valve接口实例。the ValveContext被Pipeline中的内部类所实现,以至于the ValveContext 能够访问the pipeline中的所有成员变量。the ValveContext接口中的invokeNext方法是十分重要的,方法签名如下:
?????? public void invokeNext(Request request,Response response)
???????????? throws IOException,ServletException;
? 创建一个ValveContext实例后,the pipeline就要调用the ValveContext中invokeNext方法。the ValveContext将首先调用the pipeline中的第一个valve,在处理第一个valve任务之前,第一个valve将会调用下一个valve.the ValveContext会传给this给每个valve,这样就可以调用ValveContext中的invokeNext方法,下面的方法签名是Valve接口的invoke方法。
???????? ? public void invoke(Request request,Response response,ValveContext valveContext)
????????????????????? throws IOException,ServletException;
????? 实现了Valve中的invoke方法就是像下面的代码一样做这些事:
??? public void invoke(Request request,Response response,ValveContext valveContext)
????????????????????? throws IOException,ServletException{
???? //通过传给request和response给pipeline中的下一个valve
????? valveContext.invokeNext(request,response);
?????? //现在就执行valve应该做的任务
????? ....
???? }
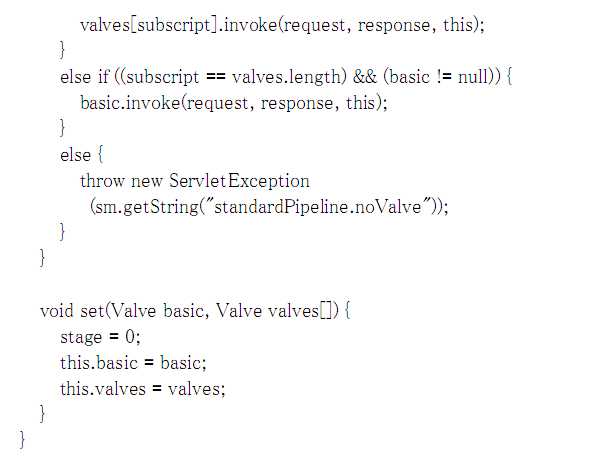
the org.apache.cataline.core.StandardPipeline类在整个Container实现了Pipeline接口。在Tomcat4.这个类有一个内部类叫做StandardPipelineValveContext(实现了ValveContext接口),下面的代码就是StandardPipelineValveContext的标准实现:
?
protected class StandardPipelineValveContext


        implements ValveContext {


  protected int stage = 0;


  public String getInfo() {


            return info;


        }


      public void invokeNext(Request request, Response response)


            throws IOException, ServletException {


            int subscript = stage;


            stage = stage + 1;


            // Invoke the requested Valve for the current request thread


            if (subscript < valves.length) {


                valves[subscript].invoke(request, response, this);


            } else if ((subscript == valves.length) && (basic != null)) {


                basic.invoke(request, response, this);


            } else {


                throw new ServletException


                    (sm.getString("standardPipeline.noValve"));


            }


        }


}
?
注解:这种管道方式的调用方式非常值得借鉴,他的调用相当于堆栈形式那样,读者要用心的去调式跟踪一下他们的调用方式。以后在项目可以运用这种方法。强烈推荐。。。。
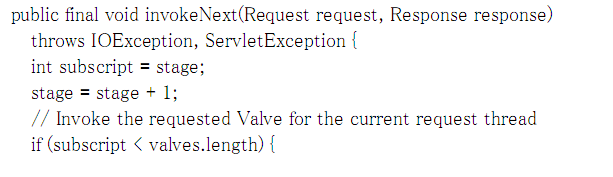
The invokeNext方法使用了subscript和stage变量,这两个变量时控制valve调用的。当首次从pipeline中的invkoe方法中调用时,subscript的值是0,stage的值变成1.因此第一个valve(array index 0)被调用.第一个valve在Pipeline中接收到ValveContext实例,然后就在实现valve接口类中的invokeNext方法被调用(这样如此有回调回来了)。然而,the subscript的值变成1以至于第二个valve被调用,以此类推。
???? 当the invokeNext方法被调用到最后一个valve时,subscript的值与valves的值是相等的。结果,the basic valve被调用。
?
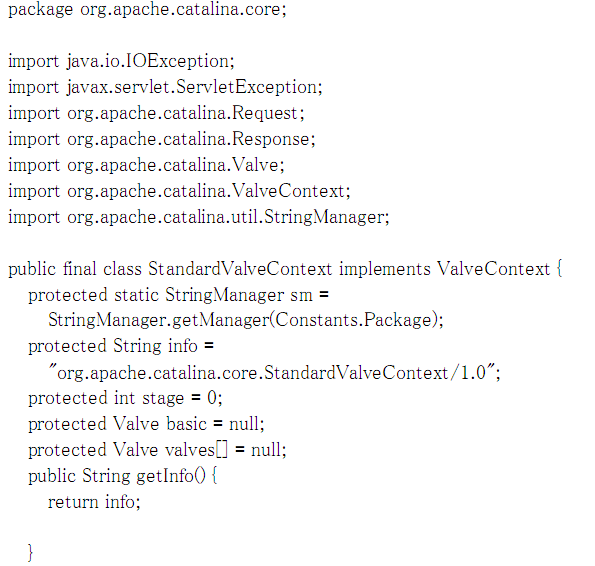
????? Tomcat5从StandadrPipeline中移除了内部类StandardPipelineValve,而是依赖于org.apache.core包中的StandardValveContext类。下面会呈现出其代码:
???? 
?
?
???? 你能看到在Tomcat4中的StandardPipelineValveContext类与在Tomcat5中的StandardPipelineValveContext有什么类似的吗?
??? 我们将会更详细的解释the Pipeline、Valve、ValveContext接口。同时也会讨论在org.apache.catalina.Contained接口(这个接口有一个Valve类实现)。
三、The Pipeline接口
???? The Pipeline接口的第一个方法,我们已经提到了就是invoke方法,一个Container在Pipeline调用Valves的invoke方法和basic valve。the Pipeline接口允许你添加一个Valve(通过调用addValve方法),允许移除一个Valve(通过调用removeValve方法)。最后,你需要用setBasic方法分配一个basic valve给pipeline,而getBasic方法是获得basic valve.最后被调用的Invoke方法的basic valve主要负责处理the request和相应的response。下面的代码是The Pipeline接口:
?
package org.apache.catalina;


import java.io.IOException;
import javax.servlet.ServletException;
public interface Pipeline {
    public Valve getBasic();
    public void setBasic(Valve valve);
    public void addValve(Valve valve);
    public Valve[] getValves();
    public void invoke(Request request, Response response)
        throws IOException, ServletException;
     public void removeValve(Valve valve);

}
?四、The Valve接口
???? The Valve接口代表了一个阀值,主要是处理request请求。这个接口有两个方法:invoke和getInfo方法。The invoke方法已经在上面讨论了。The getInfo方法就是返回实现Valve的相关信息。下面是关于Valve接口的代码:
?
package org.apache.catalina;


import java.io.IOException;
import javax.servlet.ServletException;
public interface Valve {
      public String getInfo();
      public void invoke(Request request, Response response,
                       ValveContext context)
        throws IOException, ServletException;

}
?五、The ValveContext接口
这个接口有两个方法:The invokeNext方法,此方法已经在上面讨论了,the getInfo方法是返回实现ValveContext接口类的相关信息。下面代码是The ValveContext接口:
package org.apache.catalina;


import java.io.IOException;
import javax.servlet.ServletException;
public interface ValveContext {
      public String getInfo();
      public void invokeNext(Request request, Response response)
        throws IOException, ServletException;

}
?六、The Contained接口
一个Valve类能够任意实现the org.apache.catalina.Contained接口。实现这个接口的类主要的目的就是想和一个Container实例相关(至多一个),下面是The Contained接口的代码:
package org.apache.catalina;
public interface Contained {
    public Container getContainer();
    public void setContainer(Container container);

}
?七、The Wrapper接口
The org.apache.catalina.Wrapper接口代表了一个封装。A Wrapper是代表了一个单个的Servlet定义的信息的容器。The Wrapper接口继承了Container接口还添加许多新的方法。实现Wrapper接口主要的责任就是管理Servlet的生命周期,比如:调用init、service、destory方法。由于一个Wrapper是容器中层次最低的一个,所有它是不允许添加孩子。如果用户调用了addChild方法,那么就会抛出IllegalArgumentException异常。
????? 在Wrapper接口中最为重要的方法还是allocate和load方法。
The allocate方法为the servlet初始化实例。The allocate方法也在考虑是否the servlet实现了javax.servlet.SingleThreadModel接口,但是我们将会在下面的章节讨论(11章)。The load 方法就是加载和初始化servlet实例。下面是allocate和load方法标签:
???? public javax.servlet.Servlet allocate() throws javax.servlet.ServletException;
???? public void load() throws javax.servlet.ServletException;
当我们在讨论org.apache.catalina.core.StandardWrapper类(这个是在第11章讨论),我们才会谈论Wrapper接口的其他方法。
???? 八、The Context 接口
?? 一个Context代表了一个Web应用的容器。一个Context通常有一个或者更多的Wrappers作为它的孩子容器。
? 此接口有重要的方法就是addWrapper、createWrapper等,这个接口将会在第12章会详细的讲到。
?
九、The Wrapper应用程序
这个应用程序为了证明怎样写一个微型的container模块。这个应用的核心类是ex05.pyrmont.core.SimpleWrapper(实现了Wrapper接口)。一个Pipeline(这个接口被ex05.pyront.core.SimplePipeline类实现)和一个Loader接口(被ex05.pyront.core.SimpleLoader实现)是The SimpleWrapper类的成员变量。The Pipeline包含了一个basic valve(ex05.pyrmont.core.SimpleWrapperValve)和两个valves(ex05.pyrmont.core.ClientIPLogger和ex05.pyrmont.core.HeaderLoggerValve)。下面是这个应用程序的类图:
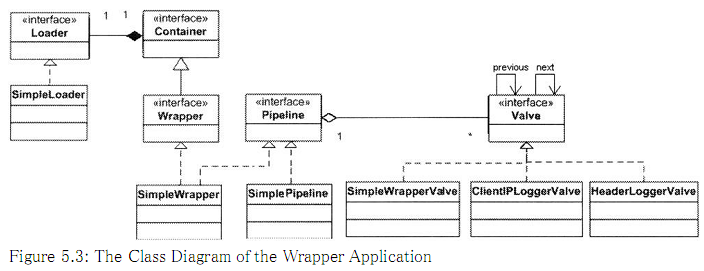
?? 注意The container 使用了Tomocat4的默认连接器
?? The wrapper封装了ModernServlet(这个你应该在前面的章节使用过)这个应用程序证明:你有一个由仅仅一个Wrapper组成的servlet容器。整个类没有完完全全的实现整个功能,但是实现的一些方法将会在这些类中呈现出来。现在让我们来详细了解这些类的运行。
十、ex05.pyrmont.core.SimpleLoader
在容器中加载servlet类的任务被指定给实现Loader接口类的身上。在这个应用中SimpleLoader类就充当这个责任。SimpleLoader要知道servlet类的位置,并要有一个getClassLoader方法,目的就是返回一个java.lang.ClassLoader实例(搜索servlet类的位置)。The SimpleLoader类定义了三个成员变量。第一个成员变量就是WEB_ROOT(指定要查找的servlet类的目录)。代码如下:
public static final String WEB_ROOT =
	    System.getProperty("user.dir") + File.separator  + "webroot";
?其他的两个变量是ClassLoader和Container应用变量:
 ClassLoader classLoader = null;
	  Container container = null;
?The SimpleLoader类的构造函数初始化the class loader,目的是为了准备返回一个the SimpleWrapper实例。
	  public SimpleClassLoader() {
		    try {
		      URL[] urls = new URL[1];
		      URLStreamHandler streamHandler = null;
		      File classPath = new File(WEB_ROOT);
		      String repository = (new URL("file", null, classPath.getCanonicalPath() + File.separator)).toString() ;
		      urls[0] = new URL(null, repository, streamHandler);
		      classLoader = new URLClassLoader(urls);
		    }
		    catch (IOException e) {
		      System.out.println(e.toString() );
		    }

		  }
?这个构造函数的代码在前面的章节出现过,这里就不在详细的解释。
The Container成员变量代表的是The Container与这个Loader相关联。
?
?? 注意的是Loaders将会在第八章会详细的讨论。
十一、ex05.pyrmont.core.SimplePipeline
? The SimplePipeline类实现了org.apache.catalina.Pipeline接口。十分重要的方法就是the invoke方法,它同时也包含了一个内部类SimplePipelineValveContext.SimplePipelineValveContext实现了org.apache.catalina.ValveContext接口
这个实现的细节在"Pipelining Task"中已经讨论了。
?
十二、ex05.pyrmont.core.SimpleWrapper
?? 这个类实现了org.apache.catalina.Wrapper接口,并且实现了allocate和load方法。其他的就是,这个类定义了以下
成员变量:
?
	private Loader loader;

	private Container parent;
?The loader成员变量是一个常常用到的类加载器接口。The parent成员变量代表了这个Wrapper的父类容器,这样就意味着这个wrapper能够成为别的容器(Conetx)的孩子容器。
?
特别注意的就是SimpleWrapper类中的getLoader方法,下面就是其代码:
?
public Loader getLoader() {
		if(loader!=null)
			return loader;
		else if(parent!=null)
			return parent.getLoader();

		return null;
	}
?The getLoader方法返回一个Loader(经常加载一个sevlet类),如果the Wrapper与一个Loader相关联,这个Loader就会返回。如果没有,就会返回父类容器的Loader。如果父类容器也没有,那么就只能返回null.
?
?? The SimpleWrapper类有一个pipeline和设置一个basic valve给pipeline.你会在the SimpleWrapper构造函数中会做这样的事,下面的代码进行说明:
public SimpleWrapper() {
		pipeline.setBasic(new CallServletValve());
	}
?这儿pipeline作为SimplePipeline类的成员变量,代码如图所示:
/***
	 * 只要new SimpleWrapper()就把Container容器传过来,
	 * 因为SimpleWrapper实现了Wrapper接口而Wrapper继承了
	 * Container接口,注意的是为什么要new SimpleWrapper()
	 * 呢?
	 * 这是因为SimpleWrapper这个类代理调用了SimplePipeLine
	 * 的方法,这样做的好处就是客户写程序时不再去面对SimplePipeLine类,
	 * 而只需要关注SimpleWrapper这个类的方法就行,
	 */
	private SimplePipeline pipeline = new SimplePipeline(this);
?
十三、ex05.pyrmont.core.SimpleWrapperValve
The SimpleWrapperValve类是一个the basic valve(专门处理the SimpleWrapper类中的request请求)。SimpleWrapperValve实现了the org.apache.catalina.Valve接口,同时还实现了the org.apache.catalina.Contained接口。在SimpleWrapperValve十分重要的方法就是the invoke方法,下面是其方法的代码:
	public void invoke(Request request, Response response,
			ValveContext context)
			throws IOException, ServletException {
//		System.out.println("这个是CallServletValve中的容器:"+getContainer());
	    SimpleWrapper wrapper = (SimpleWrapper) getContainer();
	    ServletRequest sreq = request.getRequest();
	    ServletResponse sres = response.getResponse();
	    Servlet servlet = null;
	    HttpServletRequest hreq = null;
	    if (sreq instanceof HttpServletRequest)
	      hreq = (HttpServletRequest) sreq;
	    HttpServletResponse hres = null;
	    if (sres instanceof HttpServletResponse)
	      hres = (HttpServletResponse) sres;

	    // 分配一个servlet实例,调用servlet中service()方法
	    try {
	      servlet = wrapper.allocate();
	      if (hres!=null && hreq!=null) {
	        servlet.service(hreq, hres);
	      }
	      else {
	        servlet.service(sreq, sres);
	      }
	    }
	    catch (ServletException e) {
	    }
	}
?因为SimpleWrapperValve被作为basic valve,所以The invoke方法不需要调用the ValveContext中的invokeNext方法。The invoke方法调用了the SimpleWrapper类中的the allocate方法,目的是获得一个servlet实例,然而该实例就会调用本身方法service。注意the Wrapper的pipeline中的the basic valve调用了servlet的service方法,而不是the wrapper本身调用的。
十四、ex05.pyrmont.valves.ClientIPLoggerValve
? The ClientIPLoggerValve类主要职责就是把客户的IP地址打印在控制台上,下面是其代码:
package org.hewen.jerry.conatiner;

import java.io.IOException;

import javax.servlet.ServletException;
import javax.servlet.ServletRequest;

import org.apache.catalina.Request;
import org.apache.catalina.Response;
import org.hewen.jerry.inter.Contained;
import org.hewen.jerry.inter.Container;
import org.hewen.jerry.inter.Valve;
import org.hewen.jerry.inter.ValveContext;

public class ClientLoggerValve implements Contained, Valve {
	protected Container container;
	public Container getContainer() {
		return this.container;
	}

	public void setContainer(Container container) {
		this.container=container;
	}

	public void invoke(Request request, Response response, ValveContext context)
			throws IOException, ServletException {

		 context.invokeNext(request, response);
		 System.out.println("该阀门的职责就是获取客户端的IP");
//		 System.out.println("这是ClientLoggerValve容器:"+getContainer());

		 ServletRequest sreq = request.getRequest();
		 System.out.println(sreq.getRemoteAddr());
		 System.out.println("------------------------------------");
	}

}
?注意the invoke方法。the invoke第一件事就是调用了The ValveContext的invokeNext方法,这样调用的目的就是为了在pipeline中调用下一个valve的invoke方法。这个类也打印了一些字符串包括输出了the request对象的远程地址方法。
?
十五、ex05.pyrmont.valves.HeaderLoggerValve
这个类与the ClientIPLoggerValve类十分相似,The HeaderLoggerValve类主要职责就是在控制台上打印the request的相关信息。下面的代码所示:
package org.hewen.jerry.conatiner;

import java.io.IOException;
import java.util.Enumeration;

import javax.servlet.ServletException;
import javax.servlet.ServletRequest;
import javax.servlet.http.HttpServletRequest;

import org.apache.catalina.Request;
import org.apache.catalina.Response;
import org.hewen.jerry.inter.Contained;
import org.hewen.jerry.inter.Container;
import org.hewen.jerry.inter.Valve;
import org.hewen.jerry.inter.ValveContext;

public class HeaderLoggerValve implements Contained, Valve {

	protected Container container;
	public Container getContainer() {
		return this.container;
	}

	public void setContainer(Container container) {
		this.container=container;
	}


	public void invoke(Request request, Response response, ValveContext context)
			throws IOException, ServletException {
		context.invokeNext(request, response);

		System.out.println("这个阀门所做的事就是获取请求头的信息");
//		System.out.println("这个是HeaderLoggerValve容器:"+getContainer());
		ServletRequest serRequest=request.getRequest();
		if(serRequest instanceof HttpServletRequest){
			HttpServletRequest hsr=(HttpServletRequest)serRequest;
			Enumeration names=hsr.getHeaderNames();
			while(names.hasMoreElements()){
				String name=names.nextElement().toString();
				String value=hsr.getHeader(name);
				System.out.println(name+" :"+value);
			}
		}else{
			System.out.println("没有相应Http请求");
		}
		System.out.println("----------------------------------");

	}

}
?现在反复强调特别注意the invoke 方法。the invoke第一件事就是调用了The ValveContext的invokeNext方法,这样调用的目的就是为了在pipeline中调用下一个valve的invoke方法。这个类也打印了一些头部信息。
?
十六、ex05.pyrmont.startup.Bootstrap1
The Bootstrap1类是用来启动这个应用程序,下面给出其代码:
package ex04.pyrmont.startup;

import org.apache.catalina.connector.http.HttpConnector;
import org.hewen.jerry.conatiner.ClientLoggerValve;
import org.hewen.jerry.conatiner.HeaderLoggerValve;
import org.hewen.jerry.conatiner.SimpleClassLoader;
import org.hewen.jerry.conatiner.SimpleWrapper;
import org.hewen.jerry.inter.Loader;
import org.hewen.jerry.inter.Pipeline;
import org.hewen.jerry.inter.Wrapper;

public final class Bootstartup {
	public static void main(String[] args){
		HttpConnector connector=new HttpConnector();
		Wrapper wrapper=new SimpleWrapper();
		wrapper.setServletClass("ModernServlet");
		Loader loader=new SimpleClassLoader();
		ClientLoggerValve clientValve=new ClientLoggerValve();
		HeaderLoggerValve headerValve=new HeaderLoggerValve();
		((Pipeline)wrapper).addValve(clientValve);
		((Pipeline)wrapper).addValve(headerValve);

		wrapper.setLoader(loader);

		connector.setMyDefContainer(wrapper);

		try {
			connector.initialize();
			connector.start();
			System.in.read();
		} catch (Exception e) {
			e.printStackTrace();
		}


	}
}
?创建了HttpConnector和SimpleWrapper实例后,The Bootstrap类的main方法把ModernServlet传给SimpleWrapper的setServletClass方法(即作为参数传递),目的就是为了告知the wrapper要加载以该名称的class。
??????? wrapper.setServletClass("ModernServlet");
接下来就是创建一个Loader和两个Valves并且把loader传给wrapper,下面代码:
??? Loader loader=new SimpleLoader();
??? Valve valve1=new HeaderLoggerValve();
??? Valve valve2=new ClientIPLoggerValve();
??? wrapper.setLoader(loader);
?两个valves就会被添加到the wrapper中的pipeline上。
???? ((Pipeline)wrapper).addValve(valve1);
??? ??? ((Pipeline)wrapper).addValve(valve2);
?最后,The wrapper被the Connector类的setContainer方法当做参数传递,接着就是the connector 的初始化和启动,下面代码:
?????? connector.setContainer(wrapper);
????? try{
?????????????? connector.initialize();
?????????????? connector.start();
?????? }
????? 下面的代码就是允许用户停止应用
?
?
?? System.in.read();
十七、运行这个应用程序
??? 这里我就不翻译了,我当时做的就是直接在myEclipse中新建一个项目,再把源代码加上去就可以了,运行浏览器url地址就OK。。。。这里就不详细分析。。。。