在前两篇中,体验了Knockout的基本验证和自定义验证。本篇自定义验证信息的显示位置与内容。
自定义验证信息的显示位置
通常,Knockout的验证信息紧跟在input后面,通过validationMessage属性可以自定义验证信息的显示位置。
monospace; width: 100%; margin: 0em; background-color: #f0f0f0">@{ViewBag.Title = "Index";Layout = "~/Views/Shared/_Layout.cshtml";}<style type="text/css">.error {color: red;}</style><div><input type="text" data-bind="value: name"/><p class="error" data-bind="validationMessage: name"></p></div>@section scripts{<script src="~/Scripts/knockout-3.2.0.js"></script><script src="~/Scripts/knockout.validation.js"></script><script src="~/Scripts/zh-CN.js"></script><script type="text/javascript">//使用构造函数创建一个View Modelvar Product = function () {this.name = ko.observable().extend({ minLength: 3 });};//创建实例var product = new Product();//验证设置var knockoutValidationSettings = {insertMessages: false,decorateElement: false,errorMessageClass: 'error',errorElementClass: 'error',errorClass: 'error',errorsAsTitle: true,parseInputAttributes: false,messagesOnModified: true,decorateElementOnModified: true,decorateInputElement: true};ko.validation.init(knockoutValidationSettings, true);//绑定ko.applyBindings(product);$(function () {ko.decorateElement = false;});</script>}
以上,
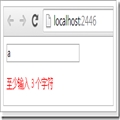
● 把验证信息显示在了data-bind属性值为validationMessage: name的input上
● 由于重新设置了Knockout-Validation,必须使用ko.validation.init()重新初始化
● insertMessages表示是否把验证信息显示在紧跟input的位置
● decorateElement表示是否要为input加上class="error"

自定义验证信息的内容
如果想重写验证信息的内容,修改如下:
var Product = function () {this.name = ko.observable().extend({ minLength: { params: 3, message: "要我说最小长度是3" } });};