上一篇我们实现了系统模块的一些功能,对angular的使用更深入了一点.
今天这篇我们要实现实时预览的功能,将学习到如何使用nw.js打开额外新窗口,窗口之间如何通信,并将引入新的开源框架marked,用于markdown的解析.
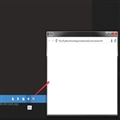
预览的功能我将在编辑器之外的新窗口里实现,因为我平常都习惯使用双显示器,这样能把预览放在另一个显示器.
先在studio/views里新增preview.html,作为预览的窗口页面.
1
2
3
4
5
6
7
8
9
10
11
12
13
<!DOCTYPE html>
<html lang="en">
<head>
	<meta charset="UTF-8" />
	<title>预览</title>
</head>
<body>
  <article  class="markdown-body" id="content">
  </article>
  <script src="../../../lib/jquery-2.1.3.js"></script>
  <script src="../preview.js"></script>
</body>
</html>
studio/directives.js里增加打开预览窗口的directive
1
2
3
4
5
6
7
8
9
10
11
12
13
14
15
16
17
18
19
20
21
22
23
24
25
26
//预览
studio.directive('studioPreview',function">function(){
  return function($scope,elem){
    $(elem[0]).on('click',function(){
      var previewWinUrl = ('file:///' + require('path').dirname(process.execPath) + '/app/modules/studio/views/preview.html').replace(/\\/g,'/');
      if (!hmd.previewWin) {
      	//开发时为了方便调试,设置toolbar:true,发布时设为false.
        hmd.previewWin = require('nw.gui').Window.open(previewWinUrl, {
          position: 'center',
          "toolbar": true,
          "frame": true,
          "width": 800,
          "height": 600,
          "min_width": 600,
          "min_height": 400,
          "icon": "app/img/logo.png"
        });
        //关闭的时候置空preivewWin变量
        hmd.previewWin.on('close', function () {
          hmd.previewWin = null;
          this.close(true);
        });
      }
    });
  };
});
预览窗口每次只能打开一个,所以打开之前会先判断hmd.previewWin是否已存在,并且窗口关闭事件里将hmd.previewWin置空.
studio/views/studio.html里绑定预览按钮
1
2
3
...
<a studio-preview href="javascript://" class="btn btn-primary" title="预览"><i class="glyphicon glyphicon-eye-open"></i></a>
...
这样就实现了点击预览按钮打开预览窗口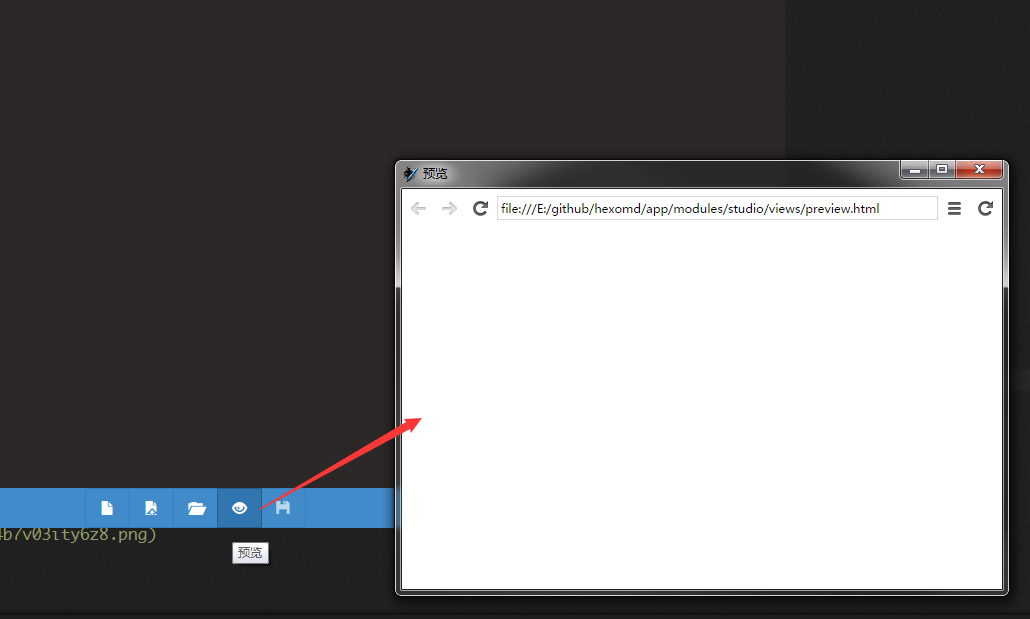
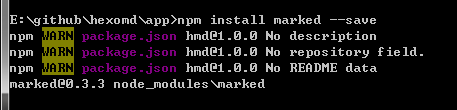
markdown的解析我使用开源的marked.
安装marked
打开命令行,进入app目录,输入安装命令:
1
npm install marked --save
为editor.js增加markdown解析的方法,输出当前编辑器内容解析后的结果.
1
2
3
4
5
6
7
8
9
10
11
12
13
14
15
16
17
18
19
20
21
22
23
24
init: function (options,filepath) {
  ...
  this.initMarked();
  this.cm = CodeMirror.fromTextArea(el, options);
  ...
},
//初始化解析模块
initMarked:function(){
  this.marked = require('../app/node_modules/marked');
  this.marked.setOptions({
  renderer: new this.marked.Renderer(),
  gfm: true,
  tables: true,
  breaks: false,
  pedantic: false,
  sanitize: true,
  smartLists: true,
  smartypants: false
  });
},
//解析markdown
parse:function(){
  return this.marked(this.cm.getValue());
},
这里要注意的是this.marked = require('../app/node_modules/marked');,而不是直接require('marked'),这是因为nw.js的这个问题
修改directive
1
2
3
4
5
6
7
8
9
10
11
12
13
14
15
16
17
18
19
20
21
22
23
24
25
26
27
28
29
30
//预览
studio.directive('studioPreview',function(){
  return function($scope,elem){

    //修改文本时更新预览,change事件触发非常频繁,所以这里使用setTimeout防止无意义的频繁解析.
    var changeTimer;
    hmd.editor.on('change',function(){
      clearTimeout(changeTimer);
      changeTimer = setTimeout(function(){
      	hmd.previewWin && hmd.previewWin.emit('change', hmd.editor.parse());
      },200);
    });
    //打开文件时更新预览
    hmd.editor.on('setFiled',function(filepath){
      hmd.previewWin && hmd.previewWin.emit('change', hmd.editor.parse());
    });

    $(elem[0]).on('click',function(){
      	//省略...
        hmd.previewWin.on('loaded',function(){
          hmd.previewWin && hmd.previewWin.emit('change', hmd.editor.parse());
        });
        hmd.previewWin.on('close', function () {
          hmd.previewWin = null;
          this.close(true);
        });
      }
    });
  };
});
我们通过自定义事件emit('change', hmd.editor.parse())来与previewWin窗口通讯. 在初始化窗口,打开文件,修改文件时都触发窗口的change事件,将解析后的内容作为事件参数传递.
新建脚本文件studio/preview.js,并在preview.html里引用
1
2
3
4
var gui = require('nw.gui'), win = gui.Window.get();
win.on('change', function (mdHtml) {
  $('#content').html(mdHtml);
});
preview.js里监听change事件,然后将解析后的内容直接显示到页面上.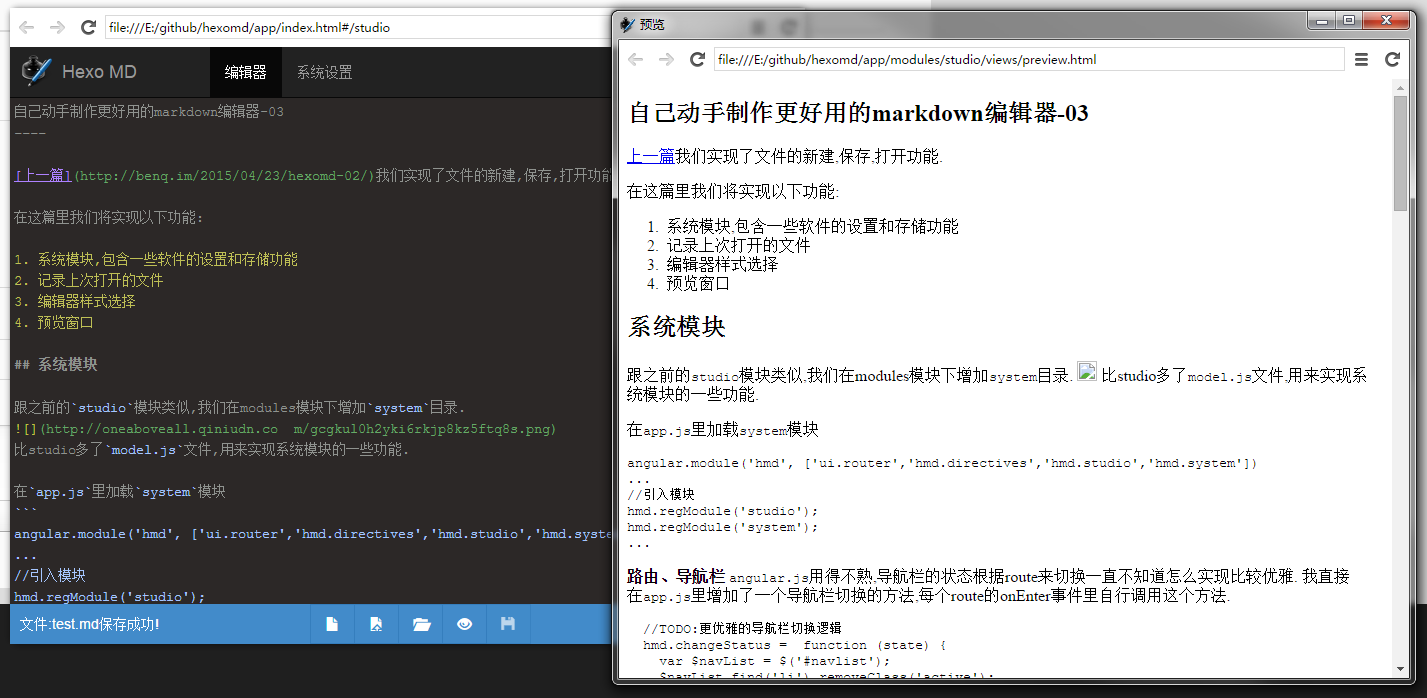
现在已经可以实时的预览了,但功能还是过于简单,使用起来很不方便,这一节将优化预览窗口的使用体验.
如果文本太多导致出现滚动条,预览窗口还是会一直显示在第一屏,并不会跟随我们在编辑器中的查看位置来实时的更新预览的位置.我们要看预览还要手动去调整预览窗口的滚动条高度,这样的体验完全等于没法使用,因此现在来实现预览窗口随着编辑器的滚动条高度等比随动.
codemirror已经实现了scroll事件,节省了我们大量的工作量,这个框架的作者考虑的真是周到,不得不赞一下.
我们在editor.js对scroll事件进行封装.
1
2
3
4
//滚动事件
this.cm.on('scroll',function(cm){
  me.fire('scroll',cm.getScrollInfo());
});
在directive里将编辑器滚动事件传递给预览窗口
1
2
3
4
5
6
7
8
9
10
11
12
studio.directive('studioPreview',function(){
   ...
     //编辑器滚动
     var scrollTimer;
     hmd.editor.on('scroll',function(scrollInfo){
       clearTimeout(scrollTimer);
       scrollTimer = setTimeout(function(){
       	hmd.previewWin && hmd.previewWin.emit('editorScroll',scrollInfo);
       },200);
     });
   ...
 }
同样的道理,我们应该防止太频繁的触发
最后在preview.js里响应editorScroll事件,并更新预览页面的滚动条高度
1
2
3
4
win.on('editorScroll',function(scrollInfo){
  var scrollTop = $(document.body).height()*scrollInfo.top/scrollInfo.height;
  $(document.body).scrollTop(scrollTop);
});
默认的无样式界面看起来太不舒服了,现在来实现跟编辑器一样的可以选择或者自定义的样式.
我们将预览的样式放在/app/css/previewtheme目录下,先在里面增加两个测试用的样式文件
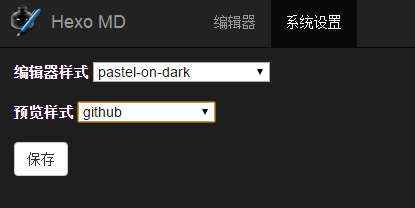
增加预览样式设置
这个跟上一篇的编辑器样式设置类似.
system/model.js增加默认配置
1
2
3
4
5
6
7
8
9
//默认设置
var defaultSystemData = {
  //最后一次打开的文件
  lastFile: null,
  //编辑器样式
  theme:'ambiance',
  //预览窗口样式
  preViewTheme:'default'
};
system/views/system.html增加表单字段
1
2
3
4
5
6
7
8
9
10
11
<div class="content studio-wrap">
  <form class="system-form" name="systemForm">
    ...
    <div class="form-group">
      <label>预览样式</label>
      <select name="preViewTheme" ng-model="systemSetting.preViewTheme"  ng-options="k as v for (k, v) in preViewThemes">
      </select>
    </div>
    ...
  </form>
</div>
system/controllers.js
1
2
3
4
5
6
7
8
9
10
11
12
13
14
15
16
17
18
19
20
21
var system = hmd.system,
	fs = require('fs');
//读取theme目录,生成样式列表
var readCssList = function(path){
  var files = fs.readdirSync(path),themes={};
  files.forEach(function (file) {
    if(~file.indexOf('.css')){
    	file = file.replace('.css','');
      themes[file] = file;
    }
  });
  return themes;
};
system.controller('system', function ($scope) {
  $scope.themes = readCssList('./app/lib/codemirror/theme');
  $scope.preViewThemes = readCssList('./app/css/previewtheme');
  $scope.systemSetting = system.get();
  $scope.save = function (systemSetting) {
    system.save(systemSetting);
  };
});
将读取目录所有样式文件生成键值对的代码封装成方法readCssList,然后增加$scope.preViewThemes绑定即可..
再一次感受angular的方便.
应用样式
预览页面加载成功后,通过事件setTheme将系统设置传递给预览窗口
1
2
3
4
5
6
7
8
studio.directive('studioPreview',function(){
  ...
  hmd.previewWin.on('loaded',function(){
    hmd.previewWin.emit('setTheme',hmd.system.get());
    hmd.previewWin && hmd.previewWin.emit('change', hmd.editor.parse());
  });
  ...
});
preview.js
1
2
3
win.on('setTheme',function(setting){
  $('head').append('<link href="../../../css/previewtheme/'+setting.preViewTheme+'.css" rel="stylesheet" />');
});
从网上找几个常用的marddown样式文件来看看效果,你可以自己找或写更多样式.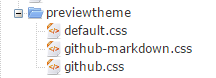

作为一个码农,写的markdown文件里都有好多代码块,肯定要把代码块弄好看点.
安装highlight.js
1
npm install highlight.js

安装完成后,代码高亮的样式文件在目录node_modules/highlight.js/styles/
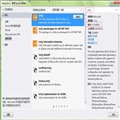
在系统设置里增加预览代码样式设置,跟之前的预览样式类似,这里直接上代码,不再重复描述了.
model.js
1
2
3
4
5
6
7
8
9
10
11
//默认设置
var defaultSystemData = {
  //最后一次打开的文件
  lastFile: null,
  //编辑器样式
  theme:'ambiance',
  //预览窗口样式
  preViewTheme:'github',
  //预览代码块样式
  preViewHighLightTheme:'default'
};
system.html
1
2
3
4
5
6
7
...
    <div class="form-group">
      <label>代码预览样式</label>
      <select name="preViewHighLightTheme" ng-model="systemSetting.preViewHighLightTheme"  ng-options="k as v for (k, v) in preViewHighLightThemes">
      </select>
    </div>
...
controllers.js
1
2
3
4
5
6
7
8
9
system.controller('system', function ($scope) {
  $scope.themes = readCssList('./app/lib/codemirror/theme');
  $scope.preViewThemes = readCssList('./app/css/previewtheme');
  $scope.preViewHighLightThemes = readCssList('./app/node_modules/highlight.js/styles');
  $scope.systemSetting = system.get();
  $scope.save = function (systemSetting) {
    system.save(systemSetting);
  };
});
系统设置截图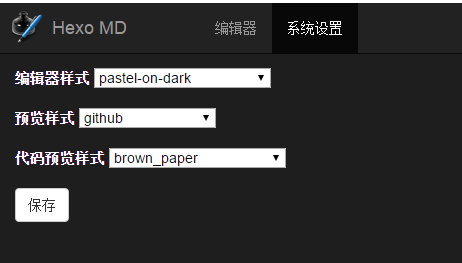
preview.js
1
2
3
4
win.on('setTheme',function(setting){
  $('head').append('<link href="../../../node_modules/highlight.js/styles/' + setting.preViewHighLightTheme +'.css" rel="stylesheet" />');
  $('head').append('<link href="../../../css/previewtheme/'+setting.preViewTheme+'.css" rel="stylesheet" />');
});
这样就完成了,很简单,没几行代码.
现在还有个小问题,主程序关掉后,预览窗口还在.
modules/directives.js
1
2
3
4
5
6
7
...
win.on('close', function () {
  var me = this;
  hmd.previewWin && hmd.previewWin.close();
  me.close(true);
});
...
监听主窗口的关闭事件,如果有预览窗口,就先关闭预览窗口再关闭自己
现在我们的markdown编辑器应该是挺好用的了,至少比一些在线的方便些,可以很灵活的定制各种样式.
做预览这个功能的时候我的想法是:一个重要的功能,不仅要实现基本功能,更重要的是完善体验,太差的体验跟没有这个功能没区别,因此我们把时间都花在优化预览的体验上.与其增加10个不常用的功能,不如把最常用的一个功能做好.
最终效果截图
主窗口
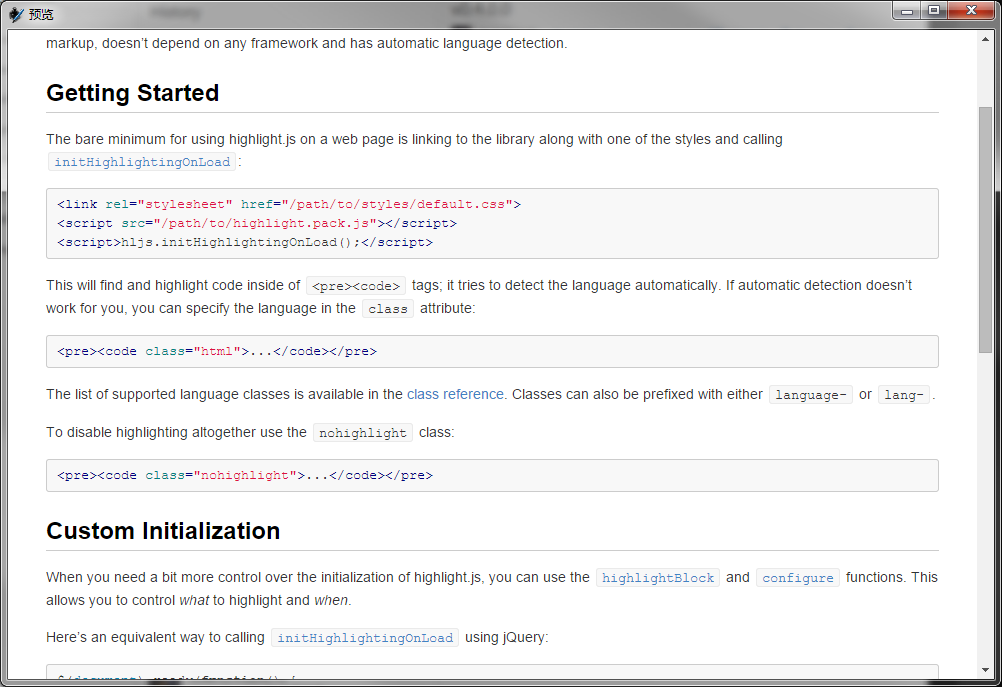
预览窗口
本篇程序打包
项目地址