yum install automake autoconf libtool libicu gcc-c++
####yum install bazel -y 这样安装
版本过新会报错:
lease downgrade your bazel installation to version 0.26.1 or lower to build
TensorFlow
yum -y install epel-release
yum -y install python-pip
git clone http://github.com/tensorflow/tensorflow
https://github.com/bazelbuild/bazel/releases/tag/0.26.1
去下载相关的版本的bazel
BAZEL_VERSION="0.26.1" # insert your desired version here, for example 0.26.0
$ wget https://github.com/bazelbuild/bazel/releases/download/${BAZEL_VERSION}/bazel-${BAZEL_VERSION}-
installer-linux-x86_64.sh # if not on x86_64, change that too
$ chmod +x bazel-${BAZEL_VERSION}-installer-linux-x86_64.sh # or the file you just downloaded
$ ./bazel-${BAZEL_VERSION}-installer-linux-x86_64.sh
$ bazel version # this should now print the same as BAZEL_VERSION
参考 https://www.cnb
logs.com/harrymore/p/10028489.html
不好用
bazel build -c opt --copt=-msse4.1 --copt=-msse4.2 //tensorflow/tools/pip_package:build_pip_package
https://www.dearcodes.com/index.php/archives/25/
pip install --upgrade pip
pip install numpy grpcio Keras-Applications Keras-Preprocessing h5py requests enum --trusted-host pypi.doubanio.com
class="java" name="code">
import tensorflow as tf
hello = tf.constant('Hello, Tensorflow!')
sess = tf.Session()
print(sess.run(hello))

a = tf.constant(66)
b = tf.constant(88)
print(sess.run(a + b))
conda create -n bazelevn python=3
source activate bazelevn
cd tensorflow
./configure
全选no
pip install numpy
git submodule foreach git pull origin master
bazel build tensorflow/python/tools:freeze_graph
################## conda 环境:
conda update --all
conda create -n bazelenv python=3
source activate bazelenv
#conda deactivate
#conda remove bazelenv
git clone http://github.com/tensorflow/tensorflow
./configure
全选no
bazel build //tensorflow:libtensorflow.so //tensorflow/contrib/session_bundle:session_bundle
############ 测试一个tf生成模型,使用模型,再用调用so的过程使用模型的过程
conda create -n tfenv
conda install -n tfenv tensorflow
参考 https://blog.csdn.net/zmlovelx/article/details/80919193
创建模型:
saver_hello.py
import tensorflow as tf
if __name__ == '__main__':
    hello = tf.Variable(tf.constant('Hello World', name = "hello"))
    #init = tf.initialize_all_variables() #deprecated
    init = tf.global_variables_initializer()
    sess = tf.Session()
    sess.run(init)
    saver = tf.train.Saver()
    saver.save(sess, "./hello_model")
使用模型:
restore_hello.py
import tensorflow as tf
if __name__ == '__main__':
    restore = tf.train.import_meta_graph("hello_model.meta")
    sess = tf.Session()
    restore.restore(sess, "hello_model")
    print(sess.run(tf.get_default_graph().get_tensor_by_name("hello:0")))
验证
python saver_hello.py
生成 hello_model.meta 等文件
python restore_hello.py
main.cpp
#include <opencv2/opencv.hpp>
#include <opencv2/dnn.hpp>
#include <opencv2/core.hpp>
int main( int argc, char **argv )
{
    if (argc != 2)
    {
        printf( "argc %d != 2\n", argc );
        exit(-1);
    }
    cv::dnn::Net net = cv::dnn::readNetFromTensorflow(argv[1]);
    return 0;
}
CMakeLists.txt
cmake_minimum_required(VERSION 2.8)
project( test )
#set(OpenCV_DIR /usr/local/Cellar/opencv@2/2.4.13.7_5)
set(OpenCV_DIR /usr/local/Cellar/opencv/4.1.1_2)
#INCLUDE_DIRECTORIES("${OpenCV_DIR}/include")

SET(CMAKE_CXX_FLAGS "-g -O3 -Ddarwin -std=c++11")

INCLUDE_DIRECTORIES("${OpenCV_DIR}/include/opencv4")
LINK_DIRECTORIES("${OpenCV_DIR}/lib")

add_executable(test main.cpp)

target_link_libraries(test opencv_core)
target_link_libraries(test opencv_highgui)
target_link_libraries(test opencv_ml)
target_link_libraries(test opencv_dnn)
注意需要opencv_dnn , 还有include的路径不太一样
mkdir build
cd build
cmake ..
make
./test ../hello_model.index
############## 需要opencv
brew search opencv
brew install opencv
#这个里面含dnn
普通的用下面这个
brew install opencv@2
#For compilers to find openblas you may need to set:
# export LDFLAGS="-L/usr/local/opt/openblas/lib"
# export CPPFLAGS="-I/usr/local/opt/openblas/include"
#For pkg-config to find openblas you may need to set:
# export PKG_CONFIG_PATH="/usr/local/opt/openblas/lib/pkgconfig"
假设安装到了/usr/local/Cellar/opencv@2/2.4.13.7_5
opencv的
helloworld:
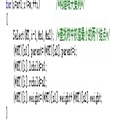
#include "opencv2/opencv.hpp"
#include "opencv2/highgui/highgui.hpp"
using namespace cv;
int main(int argc, char** argv) {
    //create a gui window:
    namedWindow("Output",1);
    //initialize a 120X350 matrix of black pixels:
    Mat output = Mat::zeros( 120, 350, CV_8UC3 );
    //write text on the matrix:
    putText(output,
            "Hello World :)",
            cvPoint(15,70),
            FONT_HERSHEY_PLAIN,
            3,
            cvScalar(0,255,0),
            4);
    //display the image:
    imshow("Output", output);
    //wait for the user to press any key:
    waitKey(0);
    return 0;
}
g++ -I/usr/local/Cellar/opencv@2/2.4.13.7_5/include -L /usr/local/Cellar/opencv@2/2.4.13.7_5/lib -lopencv_core -lopencv_highgui -lopencv_ml main.cpp
如果用cmake,
CMakeLists.txt为
cmake_minimum_required(VERSION 2.8)
project( test )
set(OpenCV_DIR /usr/local/Cellar/opencv@2/2.4.13.7_5)
INCLUDE_DIRECTORIES("${OpenCV_DIR}/include")
LINK_DIRECTORIES("${OpenCV_DIR}/lib")

add_executable(test main.cpp)

target_link_libraries(test opencv_core)
target_link_libraries(test opencv_highgui)
target_link_libraries(test opencv_ml)
注意最重要的三个库 opencv_core opencv_highgui opencv_ml
mkdir build
cd build
cmake ..
make
./test 验证
#####################