虽说WordPress内置的TinyMCE编辑器就是一款所见即所得(WYSIWYG)编辑器,然而我们在后台编辑好的文章和在前台看到的效果,总不十分一致。要让后台编辑结果和前台显示效果实现更高的匹配度,其实也不难。
简单的说,只需要声明新建一个专供供可视化编辑器使用的新CSS文件,如果该CSS文件中的样式与当前主题中CSS文件样式一致,那么我们在编辑器中“见到”的文章,就是在前台“得到”的效果了。

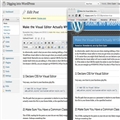
(修改后的效果)
1. 声明可视化编辑器的CSS文件
在functions.php里加上一行代码来声明可视化编辑器的CSS:
// Add CSS to Visual Editor
add_editor_style('css/custom-editor-style.css');
作为参数的文件路径是主题目录的相对路径。请确保在主题文件夹下的指定位置新建这个新的CSS文件。
2. 确保新CSS与原有CSS文件的共有类
新的CSS文件主要负责保存文章样式。文章的HTML标记通常被围在一个container元素中,类似于:
<div class="post">
<!-- all content for entire post in here -->
</div>
新的CSS文件样式有可能使用上面的类名称来设定文章专用的样式:
.post h1, .post h2, .post h3, .post h4 { font-family: MuseoLight, Georgia, serif;
font-weight: normal; margin: 0 0 10px 0; }
.post h2 { font-size: 28px; }
.post h2 { padding: 10px 180px 10px 15px;
background: #237abf url(../images/title-bg.png) repeat-x;
margin: 0; line-height: 1.3; font-size: 22px; }
.post h2, .post h2 a { color: white; text-shadow: 0 1px 2px #143855; }
.post h2 a:hover { color: #b8e0ff; }
.post h3 { font-size: 20px; padding: 5px 0; margin: 30px 0 15px 0;
border-top: 1px solid #ccc; border-bottom: 1px solid #ccc; }
.post h4 { font-size: 18px; }
.post p { margin: 0 0 10px 0; }
.post pre { background: #eee; padding: 15px;
overflow: auto; margin: 0 0 15px 0; border: 1px solid #ddd; }
.post pre code { font-size: 11px; }
.post code { background: #eee;
font: 12px Monaco, Courier, Monospace; color: #0E304A; }
.post h3 code { font-size: 18px; }
.post acronym, abbr { border-bottom: 1px dotted #514031; cursor: help; }
.post ins { text-decoration: underline; }
.post del { text-decoration: line-through; }
.post a { outline: none; text-decoration: none;
color: #19517C; background: #eee; border: 1px solid #ddd;
padding: 1px 3px 2px 3px; -webkit-border-radius: 3px;
-khtml-border-radius: 3px; -moz-border-radius: 3px; border-radius: 3px; }
.post a:hover { color: #fff; background: #143855; border: 1px solid #143855; }
(代码中的字体、字号等各项数值仅供参考)
由于可视化编辑器中没有相同的类名称,因此我们不能只是把上面的代码复制并粘贴到新CSS样式文件中,那样并不能奏效。因此我们还需要强制可视化编辑器具有同一个类名。
将下面的代码放入functions.php文件:
// Add body class to Visual Editor to match class used live
function mytheme_mce_settings( $initArray ){
$initArray['body_class'] = 'post';
return $initArray;
}
add_filter( 'tiny_mce_before_init', 'mytheme_mce_settings' );
这可能不及引用单个文件来的有效,但至少方便很多。如果你喜欢给不同文件分别设置css样式,当然也可以自己动手。
这样操作完成后,就可以最大程度上地强化“所见即所得”效果了。
文章来源:http://digwp.com/2010/11/actual-wysiwyg/
译文出处:http://www.wordpress.la/wordpress-visual-editor-WYSIWYG.html