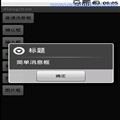
"简单消息框")
.setPositiveButton("确定", null)
.show();
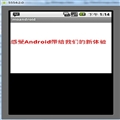
效果如下:
使用方法" src="/Upload/Images/2014122121/49EC948AD799D73C.png" alt="" />
上面的代码中我们新建了一个AlertDialog,并用Builder方法形成了一个对象链,通过一系列的设置方法,构造出我们需要的对话框,然 后调用show方法显示出来,注意到Builder方法的参数 self,这个其实是Activity对象的引用,根据你所处的上下文来传入相应的引用就可以了。例如在onCreate方法中调用,只需传入this即 可。
下面是带确认和取消按钮的对话框:
new AlertDialog.Builder(self)
.setTitle("确认")
.setMessage("确定吗?")
.setPositiveButton("是", null)
.setNegativeButton("否", null)
.show();

注意到,这里有两个null参数,这里要放的其实是这两个按钮点击的监听程序,由于我们这里不需要监听这些动作,所以传入null值简单忽略掉,但是实际开发的时候一般都是需要传入监听器的,用来响应用户的操作。
下面是一个可以输入文本的对话框:
new AlertDialog.Builder(self)
.setTitle("请输入")
.setIcon(android.R.drawable.ic_dialog_info)
.setView(new EditText(self))
.setPositiveButton("确定", null)
.setNegativeButton("取消", null)
.show();

new AlertDialog.Builder(self)
.setTitle("请选择")
.setIcon(android.R.drawable.ic_dialog_info)
.setSingleChoiceItems(new String[] {"选项1","选项2","选项3","选项4"}, 0,
new DialogInterface.OnClickListener() {
public void onClick(DialogInterface dialog, int which) {
dialog.dismiss();
}
}
)
.setNegativeButton("取消", null)
.show();

1
new AlertDialog.Builder(self)
2
.setTitle("多选框")
3
.setMultiChoiceItems(new String[] {"选项1","选项2","选项3","选项4"}, null, null)
4
.setPositiveButton("确定", null)
5
.setNegativeButton("取消", null)
6
.show();
 单选和多选对话框应该是我们平时用的非常多的,代码应该很好理解,下面再最后介绍两个
1
new AlertDialog.Builder(self)
2
.setTitle("列表框")
3
.setItems(new String[] {"列表项1","列表项2","列表项3"}, null)
4
.setNegativeButton("确定", null)
5
.show();

1
ImageView img = new ImageView(self);
2
img.setImageResource(R.drawable.icon);
3
4
new AlertDialog.Builder(self)
5
.setTitle("图片框")
6
.setView(img)
7
.setPositiveButton("确定", null)
8
.show();

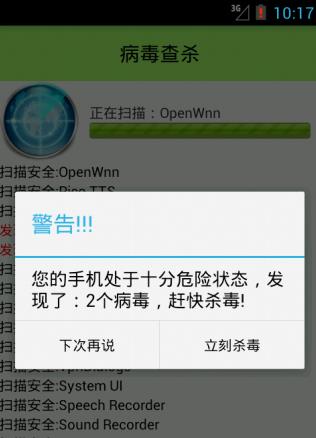
            AlertDialog.Builder builder = new Builder(AntiVirusActivity.this);
                    builder.setTitle("警告!!!");
                    builder.setMessage("您的手机处于十分危险状态,发现了:"+antiVirus.size()+"个病毒,赶快杀毒!");
                    builder.setPositiveButton("立刻杀毒", new OnClickListener() {

                        @Override
                        public void onClick(DialogInterface dialog, int which) {
                            //卸载软件
                            for(Scaninfo scaninfo : antiVirus){
                                Intent intent = new Intent();
//                                <action android:name="android.intent.action.VIEW" />
//                                <action android:name="android.intent.action.DELETE" />
//                                <category android:name="android.intent.category.DEFAULT" />
//                                <data android:scheme="package" />
                                intent.setAction("android.intent.action.DELETE");
                                intent.addCategory("android.intent.category.DEFAULT");
                                intent.setData(Uri.parse("package:"+scaninfo.packName));
                                startActivity(intent);
                            }
                        }
                    });
                    builder.setNegativeButton("下次再说", null);
                    builder.show();