A.搭建基本环境
github: https://github.com/hellovoidworld/HVWWeibo
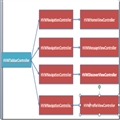
项目结构:
")
1.使用代码构建UI,不使用storyboard
")
AppDelegate:
1 - (BOOL)application:(UIApplication *)application didFinishLaunchingWithOptions:(NSDictionary *)launchOptions {
2 // Override point for customization after application launch.
3
4 // 启动后显示状态栏
5 UIApplication *app = [UIApplication sharedApplication];
6 app.statusBarHidden = NO;
7
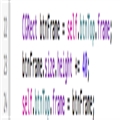
8 // 设置window
9 self.window = [[UIWindow alloc] init];
10 self.window.frame = [UIScreen mainScreen].bounds;
11
12 [self.window makeKeyAndVisible];
13
14 return YES;
15 }
2.使用LaunchImage作为启动图,不使用xib
")
3.配置图标AppIcon
")
不使用系统渲染图标
")
4.设置屏幕方向-->只有竖向
5.启动时隐藏状态栏
")
B.项目分层 & 创建PCH
1.项目分层
为了让在Finder中显示跟Xcode中显示都是分层效果,首先在Finder中建文件目录层次
")
再把文件目录拖入Xcode
")
2.创建并配置一个pch文件,来用声明
全局公共宏命令
")
配置:
")
C.添加子控制器
1.为每个Tab创建一个集成UITableViewController的类
分别是:首页、信息、
发现、我
2.创建一个集成UITabBarController的类作为window的rootViewController
AppDelegate:
 1 - (BOOL)application:(UIApplication *)application didFinishLaunchingWithOptions:(NSDictionary *)launchOptions {
 2     // Override point for customization after application launch.
 3
 4     // 启动后显示状态栏
 5     UIApplication *app = [UIApplication sharedApplication];
 6     app.statusBarHidden = NO;
 7
 8     // 设置window
 9     self.window = [[UIWindow alloc] init];
10     self.window.frame = [UIScreen mainScreen].bounds;
11
12     // 创建根控制器
13     HVWTabBarViewController *tabVC = [[HVWTabBarViewController alloc] init];
14     self.window.rootViewController = tabVC;
15
16     [self.window makeKeyAndVisible];
17
18     return YES;
19 }
3.在上述的TabBarController中创建并添加子控件
HVWTabBarViewController.m :
 1 - (void)viewDidLoad {
 2     [super viewDidLoad];
 3     // Do any additional setup after loading the view.
 4
 5     // 添加子控制器
 6     // 首页
 7     HVWHomeViewController *homeVC = [[HVWHomeViewController alloc] init];
 8     homeVC.view.backgroundColor = [UIColor redColor];
 9     homeVC.title = @"首页";
10     [self addChildViewController:homeVC];
11
12     // 消息
13     HVWMessageViewController *messageVC = [[HVWMessageViewController alloc] init];
14     messageVC.view.backgroundColor = [UIColor blueColor];
15     messageVC.title = @"消息";
16     [self addChildViewController:messageVC];
17
18     // 发现
19     HVWDiscoverViewController *discoverVC = [[HVWDiscoverViewController alloc] init];
20     discoverVC.view.backgroundColor = [UIColor yellowColor];
21     discoverVC.title = @"发现";
22     [self addChildViewController:discoverVC];
23
24     // 我
25     HVWProfileViewController *profileVC = [[HVWProfileViewController alloc] init];
26     profileVC.view.backgroundColor = [UIColor greenColor];
27     profileVC.title = @"我";
28     [self addChildViewController:profileVC];
29 }
")
4.为tab添加图片
1.需求:要区分
iOS7之前及之后的系统,使用不同的图片
这里创建一个UIImage的分类,新写一个加载图片的的方法,用来自动检测系统
版本并加载不同的图片
(1)iOS6使用普通图片, iOS7及以上系统版本使用的是带有"_os7"结尾的图片
")
(2)添加一条用来判别系统版本的宏
HVWWeibo-Prefix.pch:
 1 #ifndef HVWWeibo_HVWWeibo_Prefix_pch
 2 #define HVWWeibo_HVWWeibo_Prefix_pch
 3
 4 // Include any system framework and library headers here that should be included in all compilation units.
 5 // You will also need to set the Prefix Header build setting of one or more of your targets to reference this file.
 6
 7 // 判别是否iOS7或以上版本系统
 8 #define iOS7 ([UIDevice currentDevice].systemVersion.doubleValue >= 7.0)
 9
10 #endif
(3)创建UIImage+Extension分类
UIImage+Extension.m:
 1 #import "UIImage+Extension.h"
 2
 3 @implementation UIImage (Extension)
 4
 5 + (UIImage *) imageWithNamed:(NSString *) imageName {
 6     UIImage *image = nil;
 7
 8     // 如果是iOS7或以上版本
 9     if (iOS7) {
10         image = [UIImage imageNamed:[NSString stringWithFormat:@"%@_os7", imageName]];
11     }
12
13     // 如果是iOS6
14     if (nil == image) {
15         image = [UIImage imageNamed:imageName];
16     }
17
18     return image;
19 }
20
21 @end
(4)添加tab图标
封装一下创建子控制器的代码
HVWTabBarViewController.m:
 1 #import "HVWTabBarViewController.h"
 2 #import "HVWHomeViewController.h"
 3 #import "HVWMessageViewController.h"
 4 #import "HVWDiscoverViewController.h"
 5 #import "HVWProfileViewController.h"
 6 #import "UIImage+Extension.h"
 7
 8 @interface HVWTabBarViewController ()
 9
10 @end
11
12 @implementation HVWTabBarViewController
13
14 - (void)viewDidLoad {
15     [super viewDidLoad];
16     // Do any additional setup after loading the view.
17
18     // 添加子控制器
19     // 首页
20     HVWHomeViewController *homeVC = [[HVWHomeViewController alloc] init];
21     [self addChildViewController:homeVC WithTitle:@"首页" image:@"tabbar_home" seletectedImage:@"tabbar_home_selected"];
22
23     // 消息
24     HVWMessageViewController *messageVC = [[HVWMessageViewController alloc] init];
25     [self addChildViewController:messageVC WithTitle:@"消息" image:@"tabbar_message_center" seletectedImage:@"tabbar_message_center_selected"];
26
27     // 发现
28     HVWDiscoverViewController *discoverVC = [[HVWDiscoverViewController alloc] init];
29     [self addChildViewController:discoverVC WithTitle:@"发现" image:@"tabbar_discover" seletectedImage:@"tabbar_discover_selected"];
30
31     // 我
32     HVWProfileViewController *profileVC = [[HVWProfileViewController alloc] init];
33     [self addChildViewController:profileVC WithTitle:@"我" image:@"tabbar_profile" seletectedImage:@"tabbar_profile_selected"];
34
35 }
36
37 /** 添加tab子控制器 */
38 - (void) addChildViewController:(UIViewController *) viewController WithTitle:(NSString *) title image:(NSString *) imageName seletectedImage:(NSString *) selectedImageName {
39
40     // 设置随机背景色
41     viewController.view.backgroundColor = [UIColor colorWithRed:arc4random_uniform(256)/255.0 green:arc4random_uniform(256)/255.0  blue:arc4random_uniform(256)/255.0  alpha:1.0];
42
43     // 设置标题
44     viewController.title = title;
45     // 设置图标
46     viewController.tabBarItem.image = [UIImage imageWithNamed:imageName];
47
48     // 被选中时图标
49     UIImage *selectedImage = [UIImage imageWithNamed:selectedImageName];
50     // 如果是iOS7,不要渲染被选中的tab图标(iOS7中会自动渲染成为蓝色)
51     if (iOS7) {
52         selectedImage = [selectedImage imageWithRenderingMode:UIImageRenderingModeAlwaysOriginal];
53     }
54     viewController.tabBarItem.selectedImage = selectedImage;
55
56     // 添加子控制器
57     [self addChildViewController:viewController];
58 }
59
60 @end
")
D.添加导航控制器
1.只是在每个tab的
controller上包装了一个UINavigationController
HVWTabBarViewController.m:
 1 /** 添加tab子控制器 */
 2 - (void) addChildViewController:(UIViewController *) viewController WithTitle:(NSString *) title image:(NSString *) imageName seletectedImage:(NSString *) selectedImageName {
 3
 4     // 设置随机背景色
 5     viewController.view.backgroundColor = [UIColor colorWithRed:arc4random_uniform(256)/255.0 green:arc4random_uniform(256)/255.0  blue:arc4random_uniform(256)/255.0  alpha:1.0];
 6
 7     // 设置标题,直接设置title可以同时设置tabBarItem和navigationItem的title
 8 //    viewController.tabBarItem.title = title;
 9 //    viewController.navigationItem.title = title;
10     viewController.title = title;
11
12     // 设置图标
13     viewController.tabBarItem.image = [UIImage imageWithNamed:imageName];
14
15     // 被选中时图标
16     UIImage *selectedImage = [UIImage imageWithNamed:selectedImageName];
17     // 如果是iOS7,不要渲染被选中的tab图标(iOS7中会自动渲染成为蓝色)
18     if (iOS7) {
19         selectedImage = [selectedImage imageWithRenderingMode:UIImageRenderingModeAlwaysOriginal];
20     }
21     viewController.tabBarItem.selectedImage = selectedImage;
22
23     // 添加子控制器
24     UINavigationController *nav = [[UINavigationController alloc] initWithRootViewController:viewController];
25     [self addChildViewController:nav];
26 }
") 2.进入非NavigationController的rootViewController的时候,隐藏底部的TabBar
自定义一个集成UINavigationController的类,代替原来的原生类
重写pushViewController方法,当push的时候隐藏TabBar
#mark:此方法可以作用与所有的非rootViewController,非常好用
2.进入非NavigationController的rootViewController的时候,隐藏底部的TabBar
自定义一个集成UINavigationController的类,代替原来的原生类
重写pushViewController方法,当push的时候隐藏TabBar
#mark:此方法可以作用与所有的非rootViewController,非常好用

HVWNavigationViewController.m:
 1 #import "HVWNavigationViewController.h"
 2
 3 @interface HVWNavigationViewController ()
 4
 5 @end
 6
 7 @implementation HVWNavigationViewController
 8
 9 - (void)viewDidLoad {
10     [super viewDidLoad];
11     // Do any additional setup after loading the view.
12 }
13
14 - (void)didReceiveMemoryWarning {
15     [super didReceiveMemoryWarning];
16     // Dispose of any resources that can be recreated.
17 }
18
19 /** 重写push方法 */
20 - (void)pushViewController:(UIViewController *)viewController animated:(BOOL)animated {
21     // 如果不是根控制器,隐藏TabBar
22     if (self.viewControllers.count > 0) {
23         // 注意这里不是self(navigationController),是push出来的ViewContoller隐藏TabBar
24         viewController.hidesBottomBarWhenPushed = YES;
25     }
26
27     // 最后一定要调用父类的方法
28     [super pushViewController:viewController animated:animated];
29 }
30
31 @end
E.添加导航栏按钮
需要给各个Tab还有其下的页面添加导航栏按钮
1.在pch文件添加一个随机颜色
宏定义和一个
debug模式下的log函数
 1 //  HVWWeibo-Prefix.pch
 2 #ifndef HVWWeibo_HVWWeibo_Prefix_pch
 3 #define HVWWeibo_HVWWeibo_Prefix_pch
 4
 5 // Include any system framework and library headers here that should be included in all compilation units.
 6 // You will also need to set the Prefix Header build setting of one or more of your targets to reference this file.
 7
 8 #ifdef __OBJC__
 9     #import <UIKit/UIKit.h>
10     #import <Foundation/Foundation.h>
11     #import "UIImage+Extension.h"
12 #endif
13
14 // 测试用log
15 #ifdef DEBUG
16     #define HVWLog(...) NSLog(__VA_ARGS__)
17 #else
18     #define HVWLog(...)
19 #endif
20
21 // 判别是否iOS7或以上版本系统
22 #define iOS7 ([UIDevice currentDevice].systemVersion.doubleValue >= 7.0)
23
24 // 随机颜色
25 #define RandomColor [UIColor colorWithRed:arc4random_uniform(256)/255.0 green:arc4random_uniform(256)/255.0  blue:arc4random_uniform(256)/255.0  alpha:1.0]
26
27
28 #endif
使用宏定义的log函数,只有在debug模式下才会转化成为NSLog,release的时候会转为空
1 /** 寻找朋友按钮事件 */
2 - (void) searchFriend {
3     HVWLog(@"searchFriend");
4 }
这里可以修改运行模式:
")
")
2.创建一个集成UIBarButtonItem的分类,用来创建使用UIButton作为按钮图标的item
 1 //
 2 //  UIBarButtonItem+Extension.m
 3 //  HVWWeibo
 4 //
 5 //  Created by hellovoidworld on 15/1/31.
 6 //  Copyright (c) 2015年 hellovoidworld. All rights reserved.
 7 //
 8
 9 #import "UIBarButtonItem+Extension.h"
10
11 @implementation UIBarButtonItem (Extension)
12
13 + (instancetype) itemWithImage:(NSString *) imageName hightlightedImage:(NSString *) highlightedImageName target:(id)target selector:(SEL)selector {
14      UIBarButtonItem *item = [[self alloc] init];
15
16     // 创建按钮
17     UIButton *button = [UIButton buttonWithType:UIButtonTypeCustom];
18     UIImage *image = [UIImage imageNamed:imageName];
19     [button setImage:image forState:UIControlStateNormal];
20     [button setImage:[UIImage imageNamed:highlightedImageName] forState:UIControlStateHighlighted];
21
22     // 一定要设置frame,才能显示
23     button.frame = CGRectMake(0, 0, image.size.width, image.size.height);
24
25     // 设置事件
26     [button addTarget:target action:selector forControlEvents:UIControlEventTouchUpInside];
27
28     item.customView = button;
29     return item;
30 }
31
32 @end
3.sample:在“首页”页面加上导航栏按钮
")
 1 //  HVWHomeViewController.m
 2 - (void)viewDidLoad {
 3     [super viewDidLoad];
 4
 5     // 添加导航控制器按钮
 6     // 左边按钮
 7     self.navigationItem.leftBarButtonItem = [HVWBarButtonItem itemWithImage:@"navigationbar_friendsearch" hightlightedImage:@"navigationbar_friendsearch_highlighted" target:self selector:@selector(searchFriend)];
 8
 9     // 右边按钮
10     self.navigationItem.rightBarButtonItem = [HVWBarButtonItem itemWithImage:@"navigationbar_pop" hightlightedImage:@"navigationbar_pop_highlighted" target:self selector:@selector(pop)];
11 }
12
13 /** 左边导航栏按钮事件 */
14 - (void) searchFriend {
15     HVWLog(@"searchFriend");
16 }
17
18 /** 右边导航栏按钮事件 */
19 - (void) pop {
20     HVWLog(@"pop");
21 }
4.给所有非rootViewController加上“返回”按钮和“直接回到rootViewController”按钮
在HVWNavigationViewController的push方法中实现
#mark:由于是在NavigationController中实现,可以一举实现在所有非rootViewController中的效果。

 1 //  HVWNavigationViewController.m
 2 /** 重写push方法 */
 3 - (void)pushViewController:(UIViewController *)viewController animated:(BOOL)animated {
 4     // 如果不是根控制器,隐藏TabBar
 5     if (self.viewControllers.count > 0) {
 6         // 注意这里不是self(navigationController),是push出来的ViewContoller隐藏TabBar
 7         viewController.hidesBottomBarWhenPushed = YES;
 8
 9         // 加上“返回上一层”按钮和“直接回到根控制器”按钮
10         viewController.navigationItem.leftBarButtonItem = [UIBarButtonItem itemWithImage:@"navigationbar_back" hightlightedImage:@"navigationbar_back_highlighted" target:self selector:@selector(back)];
11
12         viewController.navigationItem.rightBarButtonItem = [UIBarButtonItem itemWithImage:@"navigationbar_more" hightlightedImage:@"navigationbar_more_highlighted" target:self selector:@selector(more)];
13     }
14
15     // 最后一定要调用父类的方法
16     [super pushViewController:viewController animated:animated];
17 }
18
19 /** 返回上一层 */
20 - (void) back {
21     [self popViewControllerAnimated:YES];
22 }
23
24 /** 返回根控制器 */
25 - (void) more {
26     [self popToRootViewControllerAnimated:YES];
27 }