在之前的博客为大家带来了很多关于Android和jsp的介绍,本篇将为大家带来,关于Andriod中常用控件及属性的使用方法,目的方便大家遗忘时,及时复习参考。好了废话不多讲,现在开始我们本篇内容的介绍。
1、控制应用显示的方向:
setRequestedOrientation(ActivityInfo.SCREEN_ORIENTATION_PORTRAIT);//竖直显示效果。
setRequestedOrientation(ActivityInfo.SCREEN_ORIENTATION_LANDSCAPE);//横向显示效果。
将上句添加在setContentView(R.layout.activity_one);下面即可。
2、文本单行显示及文本单行输入:
<!--     设置文本显示在一行      -->
 android:singleLine="true";
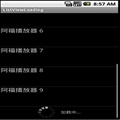
3、TabActivity的实现方法:
a、布局文件:
<RelativeLayout xmlns:android="http://schemas.android.com/apk/res/android"
    xmlns:tools="http://schemas.android.com/tools"
    android:layout_width="match_parent"
    android:layout_height="match_parent"
    android:paddingBottom="@dimen/activity_vertical_margin"
    android:paddingLeft="@dimen/activity_horizontal_margin"
    android:paddingRight="@dimen/activity_horizontal_margin"
    android:paddingTop="@dimen/activity_vertical_margin"
    tools:context=".Activitytwo" >

    <TabHost
        android:id="@+id/bookTabHost"
        android:layout_width="wrap_content"
        android:layout_height="wrap_content"
        >
        <LinearLayout
            android:id="@+id/doneBook"
            android:orientation="vertical"
            android:layout_height="wrap_content"
            android:layout_width="wrap_content"
            >
            <TextView
                android:text="边城"
                android:layout_width="wrap_content"
                android:layout_height="wrap_content"
                />
            <TextView
                android:text="围城"
                android:layout_width="wrap_content"
                android:layout_height="wrap_content"
                />
            <TextView
                android:text="追风筝的人"
                android:layout_width="wrap_content"
                android:layout_height="wrap_content"
                />
        </LinearLayout>

        <LinearLayout
            android:id="@+id/doingBook"
            android:orientation="vertical"
            android:layout_height="wrap_content"
            android:layout_width="wrap_content"
            >
            <TextView
                android:text="倾城之恋"
                android:layout_width="wrap_content"
                android:layout_height="wrap_content"
                />
            <TextView
                android:text="灿烂千阳"
                android:layout_width="wrap_content"
                android:layout_height="wrap_content"
                />
            <TextView
                android:text="活着"
                android:layout_width="wrap_content"
                android:layout_height="wrap_content"
                />
        </LinearLayout>

        <LinearLayout
            android:id="@+id/willBook"
            android:orientation="vertical"
            android:layout_height="wrap_content"
            android:layout_width="wrap_content"
            >
            <TextView
                android:text="百年孤独"
                android:layout_width="wrap_content"
                android:layout_height="wrap_content"
                />
            <TextView
                android:text="房子里的大象"
                android:layout_width="wrap_content"
                android:layout_height="wrap_content"
                />
            <TextView
                android:text="忏悔"
                android:layout_width="wrap_content"
                android:layout_height="wrap_content"
                />
        </LinearLayout>
    </TabHost>

</RelativeLayout>
b、activity代码:
public class Activitytwo extends TabActivity{
    public TabHost bookth = null;
    @Override
    protected void onCreate(Bundle savedInstanceState) {
        super.onCreate(savedInstanceState);
        bookth = getTabHost();
        LayoutInflater.from(this).inflate(R.layout.activity_two, bookth.getTabContentView(), true);
        bookth.addTab(bookth.newTabSpec("done").setIndicator("已读").setContent(R.id.doneBook));
        bookth.addTab(bookth.newTabSpec("doing").setIndicator("正读").setContent(R.id.doingBook));
        bookth.addTab(bookth.newTabSpec("will").setIndicator("未读").setContent(R.id.willBook));
    }
}
c、效果图:

值得提醒的是,目前更为推崇的方式是ViewPager+fragement
4、文本输入提示:
a、布局文件代码:
<AutoCompleteTextView
        android:id="@+id/acTextView"
        android:layout_width="match_parent"
        android:layout_height="wrap_content"
        android:hint="请输入姓名:"
        android:textColor="#000"
        android:maxLength="10"
        />
<MultiAutoCompleteTextView
        android:id="@+id/macTextView"
        android:layout_below="@id/acTextView"
        android:layout_width="match_parent"
        android:layout_height="wrap_content"
        android:hint="请输入城市:"
        android:textColor="#000"
        android:maxLength="5"
        />
b、Activity代码:
public class Activityfive extends Activity{

    private AutoCompleteTextView acTextView;
    private MultiAutoCompleteTextView macTextView;
    private String [] arr = {"abc","abx","abo","bdc","bdf"};
    private String [] brr = {"ab北京","ab南京","ab东京","bb莫斯科","bb英国","bb美国"};

    @Override
    protected void onCreate(Bundle savedInstanceState) {
        super.onCreate(savedInstanceState);
        setContentView(R.layout.activity_five);
        acTextView = (AutoCompleteTextView) findViewById(R.id.acTextView);
        macTextView = (MultiAutoCompleteTextView) findViewById(R.id.macTextView);
        ArrayAdapter<String> arrAdapt = new ArrayAdapter<String>(this, android.R.layout.simple_dropdown_item_1line, arr);
        acTextView.setAdapter(arrAdapt);
        ArrayAdapter<String> brrAdapt = new ArrayAdapter<String>(this, android.R.layout.simple_dropdown_item_1line, brr);
        macTextView.setAdapter(brrAdapt);
        macTextView.setThreshold(1);//设置输入多少个字符开始自动匹配
        macTextView.setTokenizer(new MultiAutoCompleteTextView.CommaTokenizer());//设置分隔符
    }

}
5、发送广播:
a、创建广播内容:
public class Activityone extends Activity {
    final String Intent_Action = "com.android.BroadcastReceiverDemo";//广播的地址;自定义设置
    @Override
    protected void onCreate(Bundle savedInstanceState) {
        super.onCreate(savedInstanceState);
        setContentView(R.layout.activity_one);
        Intent intent = new Intent(Intent_Action);
        intent.putExtra("name", "小米");//广播的内容
        Activityone.this.sendBroadcast(intent);//发送广播
    }
}
b、在AndroidManifest.xml中声明广播:
<!-- 设置广播接收器 -->
        <receiver
            android:name="cn.edu.hpu.android.activity_broadcast.MyBroadcastReceiver"
            android:enabled="true"
            >
            <intent-filter>
                <action android:name="com.android.BroadcastReceiverDemo" />
            </intent-filter>
        </receiver>
c、接收广播:
public class MyBroadcastReceiver extends BroadcastReceiver{

    @Override
    public void onReceive(Context context, Intent intent) {

            String name = intent.getStringExtra("name");//接收广播发送出来的数据
            Toast.makeText(context, " "+name, Toast.LENGTH_SHORT).show();

    }

}
6、获得用户网络状况:
public class MainActivity extends Activity {
    @Override
    protected void onCreate(Bundle savedInstanceState) {
        super.onCreate(savedInstanceState);
        setContentView(R.layout.activity_main);
        //获得网络连接对象
        ConnectivityManager nw = (ConnectivityManager)this.getSystemService(Context.CONNECTIVITY_SERVICE);
        NetworkInfo netinfo = nw.getActiveNetworkInfo();

        Toast.makeText(MainActivity.this, "当前网络"+add(netinfo.isAvailable())+","+"网络"+app(netinfo.isConnected())+","+"网络连接"+adp(netinfo.isConnected()), Toast.LENGTH_LONG).show();
    }

    String add(Boolean bl){
        String s = "不可用";
        if(bl==true){
            s="可用";
        }
        return s;
    }

    String app(Boolean bl){
        String s = "未连接";
        if(bl==true){
            s="已连接";
        }
        return s;
    }

    String adp(Boolean bl){
        String s = "不存在!";
        if(bl==true){
            s="存在!";
        }
        return s;
    }

}
注意:在AndroidManifest.xml文件中添加获取网络的权限:<uses-permission android:name="android.permission.ACCESS_NETWORK_STATE"/>
7、SharedPreferences存储:
SharedPreferences sp = getSharedPreferences(FILE_NAME, Context.MODE_APPEND);
                Editor editor = sp.edit();//获得编辑对象
                editor.clear();
                editor.putString("name", name);
                editor.putString("password", number);
                editor.commit();//提交内容保存
注意:FILE_NAME是我们设置的唯一标识,方便我们进行查询和修改。
8、SharedPreferences内容获得:
SharedPreferences sp = getSharedPreferences(FILE_NAME, Context.MODE_PRIVATE);
                String name1 = sp.getString("name", "");
                String password = sp.getString("password", "");
注意:FILE_NAME:要和我们上面设置的一致,这样才能取得上面的我们保存的内容。sp.getString("name", "");简单介绍一下,第一个参数是我们需要获得的数据存储时的标签,第二个参数是当我们获得数据不存在时,返回的内容。