适配器模式(Adapter),说白了就是为了挂羊头卖狗肉而专门设计的模式。也就是把一个类的接口变换成客户端所期待的另一种接口。
适配器模式通过定义一个新的接口(对要实现的功能加以抽象),和一个实现该接口的Adapter(适配器)类来透明地调用外部组件。这样替换外部组件时,最多只要修改几个Adapter类就可以了,其他源代码都不会受到影响。
? ? ?还是以手机为例子,每一种机型都自带有从电器,有一天自带充电器坏了,而且市场没有这类型充电器可买了,怎么办?万能充电器就可以解决,这个万能充电器就是适配器。
? ? ?适配器模式有两种形式,一种是类的适配,另一种自然就是对象的适配。
??? 这种适配方式,由以下几个角色组成:
(1)目标(Target)角色:这就是所期待得到的接口。注意:由于这里讨论的是类适配器模式,因此目标不可以是类。
(2)源(Adapee)角色:现在需要适配的接口。
(3)适配器(Adaper)角色:适配器类是本模式的核心。适配器把源接口转换成目标接口。显然,这一角色不可以是接口,而必须是具体类。
对象的适配依赖于对象的组合,而不是类适配中的继承。
? ? ?直接上例子来说明更容易理解。
? ? 首先来一个IPhone的充电器类(Adaptee角色):

 1 package org.scott.adapter;
 2 /**
 3  * @author Scott
 4  * @date 2013-11-23
 5  * @description
 6  */
 7 public class IPhoneCharger {
 8     public void applePhoneCharge(){
 9         System.out.println("The iPhone is charging ...");
10     }
11 }
?
现在,要对这个特殊的充电器进行适配,上个适配的接口(Target角色):
1 package org.scott.adapter;
2 /**
3  * @author Scott
4  * @date 2013-11-23
5  * @description
6  */
7 public interface ChargeAdapter {
8     public void phoneCharge();
9 }
?
因为适配有两种,所以先进行类的适配示例,创建类的适配器:
 1 package org.scott.adapterclass;
 2
 3 import org.scott.adapter.ChargeAdapter;
 4 import org.scott.adapter.IPhoneCharger;
 5
 6 /**
 7  * @author Scott
 8  * @date 2013-11-23
 9  * @description
10  */
11 public class UniversalCharger extends IPhoneCharger implements ChargeAdapter{
12
13     @Override
14     public void phoneCharge() {
15         System.out.println("The phone is charging, but which kind of phone it is, who cares ...");
16
17         //iphone charging
18         super.applePhoneCharge();
19     }
20
21 }
这就是万能充电器了,我们让它来充个电,测试类准备:
 1 package org.scott.adapterclass;
 2
 3 import org.scott.adapter.ChargeAdapter;
 4
 5 /**
 6  * @author Scott
 7  * @date 2013-11-23
 8  * @description
 9  */
10 public class AdapterClassTest {
11
12     public static void main(String[] args) {
13         ChargeAdapter charger = new UniversalCharger();
14         charger.phoneCharge();
15     }
16
17 }
?
充电结果:
The phone is charging, but which kind of phone it is, who cares ...
The iPhone is charging ...
?
ok,以上是类的适配,我们还有种对象的适配方式,创建对象的适配器:
 1 package org.scott.adapterobject;
 2
 3 import org.scott.adapter.ChargeAdapter;
 4 import org.scott.adapter.IPhoneCharger;
 5
 6 /**
 7  * @author Scott
 8  * @date 2013-11-23
 9  * @description
10  */
11 public class UniversalCharger implements ChargeAdapter{
12     IPhoneCharger iphoneCharger;
13
14     public UniversalCharger(IPhoneCharger iphoneCharger){
15         this.iphoneCharger = iphoneCharger;
16     }
17
18     @Override
19     public void phoneCharge() {
20         System.out.println("The phone is charging, but which kind of phone it is, who cares ...");
21         iphoneCharger.applePhoneCharge();
22     }
23
24
25 }
?
新一代对象适配器创建完毕,测一把:
 1 package org.scott.adapterobject;
 2
 3 import org.scott.adapter.ChargeAdapter;
 4 import org.scott.adapter.IPhoneCharger;
 5
 6 /**
 7  * @author Scott
 8  * @date 2013-11-23
 9  * @description
10  */
11 public class AdapterObjectTest {
12
13     public static void main(String[] args) {
14         IPhoneCharger iphoneCharger = new IPhoneCharger();
15         ChargeAdapter charger = new UniversalCharger(iphoneCharger);
16         charger.phoneCharge();
17     }
18
19 }
?
运行结果:
The phone is charging, but which kind of phone it is, who cares ...
The iPhone is charging ...
?
ok,目的也达到了。
小节一下。
(1)类的适配器模式:当希望将一个类转换成满足另一个新接口的类时,可以使用类的适配器模式,创建一个新类,继承原有的类,实现新的接口即可。
(2)对象的适配器模式:当希望将一个对象转换成满足另一个新接口的对象时,可以创建一个包装类,持有原类的一个实例,在包装类的方法中,调用实例的方法就行。
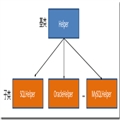
自然,最后还是要来个UML图(源自网络):
类适配:
对象适配: