转载请注明出处:http://www.cnblogs.com/kross/p/3458068.html
最近在做一些UI,很蠢很蠢的重复写了很多代码,比如一个自定义的UI Tab,由一个ImageView和一个TextView构成,如果不自定义属性的话,就需要单独new出几个Tab,然后分别给它们设置Drawable和Text。如果能使用XML属性的话,就直接在XML文件中就可以给Tab设置好Drawable和Text。Java中就可以少些几行代码。
网上看了好多例子,大部分内容都是大同小异,(可能是因为各种转载的原因吧)。有很多细节都没有提及到。自己也是琢磨了半天才弄通。
自定义XML属性,就是可以方便的给自己定义的控件,添加自定义的属性,能快捷的给控件赋状态,赋属性。
关于自定义控件,请参考我的这篇博客:《探究Android中通过继承ViewGroup自定义控件的原理》http://www.cnblogs.com/kross/p/3378395.html
自定义控件需要如下几步:
1.自定义控件
2.自定义属性
3.在布局文件中使用自定义控件和自定义属性
自定义控件,就直接写一个现在主流的Tab控件,上面一个图片,下面一行Text组成的控件,通过继承LinearLayout来实现。代码如下:
/res/layout/tab.xml
<?xml version="1.0" encoding="utf-8"?>
<LinearLayout xmlns:android="http://schemas.android.com/apk/res/android"
    android:layout_width="wrap_content"
    android:layout_height="wrap_content"
    android:orientation="vertical" >
    <ImageView
        android:id="@+id/imageview_tab_icon"
        android:layout_width="match_parent"
        android:layout_height="48dp"
        android:src="@drawable/ic_launcher"/>
    <TextView
        android:id="@+id/textview_tab_text"
        android:layout_width="match_parent"
        android:layout_height="wrap_content"
        android:gravity="center"
        android:text="KKKKKKKK"/>
</LinearLayout>
/src/view/MyTab.java //注意这里的包名是view
package view;

import android.content.Context;
import android.content.res.TypedArray;
import android.util.AttributeSet;
import android.util.Log;
import android.view.LayoutInflater;
import android.widget.ImageView;
import android.widget.LinearLayout;
import android.widget.TextView;

import com.kross.customattr.R;

public class MyTab extends LinearLayout {

    private static final String TAG = "MyTab";

    private ImageView iv = null;
    private TextView tv = null;

    public MyTab(Context context, AttributeSet attrs) {
        super(context, attrs);

        LayoutInflater.from(context).inflate(R.layout.tab, this, true);
        iv = (ImageView)this.findViewById(R.id.imageview_tab_icon);
        tv = (TextView)this.findViewById(R.id.textview_tab_text);

        iv.setImageResource(R.drawable.home);
        tv.setText("aaaaa");

    }
}
OK,这样自定义控件就完成了,需要注意的是,看好这个MyTab的包名是view。
接下来,我们要自定义XML属性
在/res/values目录下建一个attr.xml文件。里面写如下代码:
<?xml version="1.0" encoding="utf-8"?>
<resources>
    <declare-styleable name="MyTab">
        <attr name="tab_icon" format="reference"/>
        <attr name="tab_name" format="reference"/>
    </declare-styleable>
</resources>
这里需要注意的是:
declare-styleable的name要和自定义的类名一样,(刚刚我们建了一个MyTab类,这里也必须是MyTab)
里面的attr name就是属性的名字了,跟layout_width一样,format有好几种不同的值:string , integer , dimension , reference , color , enum.
当format是enum,枚举类型的时候,里面的要写成这个样子:
<attr name="testEnum">
    <enum name="fill_parent" value="-1"/>
    <enum name="wrap_content" value="-2"/>
</attr>
自定义属性完成后,可以看看R.java文件的变化。
然后,我们需要给MyTab类中添加一些处理自定义属性的代码,代码更新为如下:
package view;

import android.content.Context;
import android.content.res.TypedArray;
import android.util.AttributeSet;
import android.view.LayoutInflater;
import android.widget.ImageView;
import android.widget.LinearLayout;
import android.widget.TextView;

import com.kross.customattr.R;

public class MyTab extends LinearLayout {

    private static final String TAG = "MyTab";

    private ImageView iv = null;
    private TextView tv = null;

    public MyTab(Context context, AttributeSet attrs) {
        super(context, attrs);

        LayoutInflater.from(context).inflate(R.layout.tab, this, true);
        iv = (ImageView)this.findViewById(R.id.imageview_tab_icon);
        tv = (TextView)this.findViewById(R.id.textview_tab_text);

        iv.setImageResource(R.drawable.home);
        tv.setText("aaaaa");

        TypedArray attrArray = context.obtainStyledAttributes(attrs, R.styleable.MyTab);
        int count = attrArray.getIndexCount();
        for (int i = 0; i < count; i++) {
            int attrName = attrArray.getIndex(i);
            switch (attrName) {
            case R.styleable.MyTab_tab_icon:
                iv.setImageResource(attrArray.getResourceId(R.styleable.MyTab_tab_icon, R.drawable.ic_launcher));
                break;
            case R.styleable.MyTab_tab_name:
                tv.setText(attrArray.getString(R.styleable.MyTab_tab_name));
                break;
            }
        }
        attrArray.recycle();

    }
}
最后一步,我们就是在布局文件中使用它
看如下代码:
<LinearLayout
    xmlns:android="http://schemas.android.com/apk/res/android"
    xmlns:tools="http://schemas.android.com/tools"
    android:layout_width="match_parent"
    android:layout_height="match_parent"
    android:orientation="vertical"
    tools:context=".MainActivity" >

    <TextView
        android:layout_width="wrap_content"
        android:layout_height="wrap_content"
        android:text="@string/hello_world" />

    <view.MyTab
        android:layout_width="match_parent"
        android:layout_height="wrap_content"
           tab_icon="@drawable/ic_launcher"
           />
</LinearLayout>
这样写是不起作用的,网上很多地方都说,要加上命名空间,注意LinearLayout里面新增的命名空间:
<LinearLayout
    xmlns:android="http://schemas.android.com/apk/res/android"
    xmlns:kross="http://schemas.android.com/apk/res/view"
    xmlns:tools="http://schemas.android.com/tools"
    android:layout_width="match_parent"
    android:layout_height="match_parent"
    android:orientation="vertical"
    tools:context=".MainActivity" >

    <TextView
        android:layout_width="wrap_content"
        android:layout_height="wrap_content"
        android:text="@string/hello_world" />

    <view.MyTab
        android:layout_width="match_parent"
        android:layout_height="wrap_content"
           kross:tab_icon="@drawable/ic_launcher"
           />
</LinearLayout>
给LinearLayout加上命名空间,并给tab_icon属性前也加上命名空间,但eclipse就报错了:error: No resource identifier found for attribute 'tab_icon' in package 'view'
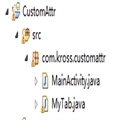
在下研究了半天,终于发现问题所在,这个命名空间必须要和manifest文件中的package属性是一样的值,这也就意味着:自定义控件的类必须要放到项目自动创建的包里面,比如我这个例子,manifest文件中package的值是com.kross.customattr,MainActivity所在的位置就是com.kross.customattr,我们需要把MyTab类,放到com.kross.customattr中,然后吧activity_main.xml里面的命名空间改成如下就OK了:

<LinearLayout
    xmlns:android="http://schemas.android.com/apk/res/android"
    xmlns:kross="http://schemas.android.com/apk/res/com.kross.customattr"
    xmlns:tools="http://schemas.android.com/tools"
    android:layout_width="match_parent"
    android:layout_height="match_parent"
    android:orientation="vertical"
    tools:context=".MainActivity" >

    <TextView
        android:layout_width="wrap_content"
        android:layout_height="wrap_content"
        android:text="@string/hello_world" />

    <com.kross.customattr.MyTab
        android:layout_width="match_parent"
        android:layout_height="wrap_content"
           kross:tab_icon="@drawable/ic_launcher"
           />
</LinearLayout>
这样就可以运行了,但把自定义控件放到activity一起会觉得很蛋疼,貌似这是一个bug,请参考这里http://code.google.com/p/android/issues/detail?id=9656。
貌似2010年就提出了,但现在也没有修复。
转载请注明出处:http://www.cnblogs.com/kross/p/3458068.html