�ٷ��ĵ�ԭ�ĵ�ַ��http://developer.android.com/guide/components/bound-services.html
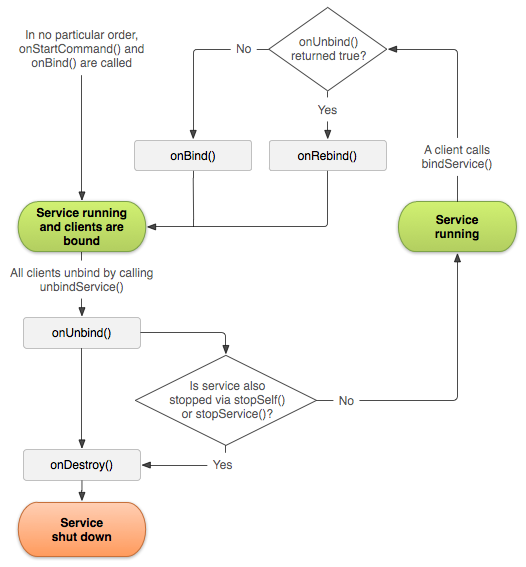
һ��Bound Service��һ���ͻ���-�������ӿ��ķ���һ��Bound Service�����������activity����һ��service�����������ܽ�����������н��̼�ͨ�š�һ��Bound Serviceͨ��ֻ��������������ṩ�����ʱ�����У�������ȷ���������ں�̨�ġ�
��ƪ�ĵ���չʾ�����ȥ����һ��Bound service��������ΰ�һ��bound service��������Ӧ�ó�������ϡ�Ȼ������ҲӦ�ù�עService���ĵ�����ȡ������ڳ���service�Ķ�������ݣ��������ͨ��service����һ��֪ͨ������service��ǰ̨�������ȵȡ� ���� һ��Bound service��Service���һ��ʵ�֣�������������Ӧ�ó������ȥ��������������������Ϊ�����ṩ��service�İ������ʵ��onBind()�ص������������������һ��IBinder���������������һ���ͻ��˿�����service���н����Ľӿڡ� һ���ͻ��˿���ͨ������bindService()����service���а�������������õ�ʱ���������ṩһ��ServiceConnection��ʵ�֣������������service�����ӡ�bindService()���Ͼ͵�����ɣ�����û���κη���ֵ�����ǵ�Androidϵͳ�����ͻ��������֮�������ʱ���������ServiceConnection��onServiceConnected()������ȥ����һ�����ڿͻ�����service������IBinder���� ����ͻ��˿���ͬʱ����service��ϵͳֻ�ڵ�һ���ͻ��˰�ʱ���������service��onBind()����ȥ��ȡһ��IBinder����Ȼ��ϵͳ�ᴫ��ͬһ��IBinder�������Ŀͻ��ˣ������ٵ���onBind()�ˡ� �����һ���ͻ��˽����service��ϵͳ�ͻ�ݻ����service������serviceҲͨ��startService()�������� ����Ҫʵ���Լ���Bound Service������Ҫ�IJ�������Ҫ����onBind()���صĽӿڡ������м��ֲ�ͬ�ķ�ʽȥ����service��IBinder�ӿڣ�����IJ��ֽ��������ۼ���ϸ�ڡ� ����һ��Bound Service ������һ����service��ʱ��������ṩһ��IBinder���ڿͻ�����service���н��������������ֶ�������ӿڵķ�ʽ�� Extending the Binder class ������service�����Ӧ����˵��˽�еģ�������ͻ�����������ͬ�Ľ������Ӧ��ͨ����չBinder����ʵ����Ľӿڣ�Ȼ��ͨ��onBind()����һ��ʵ�����ɡ��ͻ��˽���Binder�����ҿ���ֱ��ʹ�����Ĺ��з�������Щ������������Binder���棬����������service����ġ� �����service�������ں�̨���һЩ������ʱ�����ַ�ʽ�������ȵ�ѡ���㲻Ӧ��ʹ�����ַ�ʽ��Ψһԭ��������serviceͬʱ��Ҫ��������Ӧ�ó���ʹ�á� Using a Messenger �������Ҫ��Ľӿڿ���̹����������ͨ��Messenger��Ϊ���service�����ӿڡ������ַ�ʽ�Service��Ҫ����һ��Handler����Ӧ��ͬ���͵�Message�������Handler��Meesager�ܰ�IBinder����������ͻ��ˣ������ͻ���ͨ��ʹ��Message������ָ���Ļ��������⣬�ͻ��˿��Զ����Լ���Messenger������service�ܹ����ͷ�����Ϣ�� ������Ľ��̼�ͨ�ŵķ�ʽ����ΪMessenger��������һ�����߳��ģ������㲻�ò�ȥ���õ����service�����̰߳�ȫ�� Using AIDL AIDL��Android Interface Definition Language��ִ���˰Ѷ���ֽ�����ò���ϵͳ������ԭ�ӹ��ܵ����й�������������ϵͳ�������������ɽ��̼�ͨ�š�ǰһ������������ʹ��Messenger��ʵ�����ǻ���AIDL�ġ����������ᵽ�ģ�Messenger�ڵ��߳��ﴴ��һ���������пͻ��˷��͵����������������serviceһ��ֻ�ܽ���һ�������������ͬʱ����������������ֱ��ʹ��AIDL����������£����service�����Ƕ��̵߳ģ������̰߳�ȫ�� ��ֱ��ʹ��AIDL������봴��һ��.aidl�ļ������������Ľӿڡ�Android SDK����ʹ������ļ�����������Ϊһ��ʵ���˽ӿڲ��Ҵ������̼�ͨ�ŵij����࣬Ȼ������������service����չ���� �ʼǣ������Ӧ����Ӧ��ʹ��AIDL������Bound Service�ģ���Ϊ������Ҫ����̵߳Ĵ�����������ֱ�ӵĽ�����ǵ��·dz����ӵ�ʵ�֡����ԣ�AIDL���ʺϴ����Ӧ�ã���ƪ�ĵ�����������������service��ʹ�������������Ҫʹ�����Ļ�����ο�AIDL���ĵ��� Extending the Binder class ������serviceֻ���ڱ���Ӧ����ʹ�ã�����Ҫ����̹����������ʵ�����Լ���Binder����Ϊ�ͻ����ṩֱ�ӷ���service���湫�з����Ľӿڡ� �ʼǣ������Ĺ���ֻ�ڿͻ�����service����ͬһ��Ӧ�ã�ͬһ���������Ҳ����������������˵�����ַ�ʽ����һ������Ӧ����˵����ܺ��ã�����Ҫ��һ��service����activity���������ں�̨�������֡� ������������������ 1.�����service�ﴴ��һ��Binder��ʵ���� ���������ͻ��˵��õĹ��з����� ���ص�ǰservice��ʵ�������������ͻ��˵��õĹ��з����� ���߷���service�����е��������ʵ���������������ͻ��˵��õĹ��з����� 2.��onBind()�����ﷵ��Binder��ʵ���� 3.�ڿͻ������onServiceConnected()���������Binder����Ȼ�����Bound Service���ṩ�ķ����� �ʼǣ�service��ͻ��˱�����ͬһ��Ӧ�����ԭ����ǿͻ��˿���ǿ��ת�ͷ��ع����Ķ��������ԣ������Ϳ��Ե�������API�ˡ�service��ͻ��˱�����ͬһ�������������Ϊ�����ϲ�����ִ���κο���̵�ͨ�š� ���µ�������service�ṩ���ÿͻ���ֱ��ʹ�õķ�����publicclassLocalServiceextendsService{ // Binder given to clients privatefinalIBinder mBinder =newLocalBinder(); // Random number generator privatefinalRandom mGenerator =newRandom(); /** * Class used for the client Binder. Because we know this service always * runs in the same process as its clients, we don't need to deal with IPC. */ publicclassLocalBinderextendsBinder{ LocalService getService(){ // Return this instance of LocalService so clients can call public methods returnLocalService.this; } } @Override publicIBinder onBind(Intent intent){ return mBinder; } /** method for clients */ publicint getRandomNumber(){ return mGenerator.nextInt(100); } }
LocalBinder���ͻ����ṩ��getService()������������ȡ��ǰLocalService��ʵ������������˿ͻ���ֱ�ӵ���service��Ĺ��з����������������ͻ��˿��Ե���service�����getRandomNumber()������ ��������һ������LocalService��Activity������ť���µ�ʱ����getRandomNumber()��
publicclassBindingActivityextendsActivity{
    LocalService mService;
    boolean mBound =false;

    @Override
    protectedvoid onCreate(Bundle savedInstanceState){
        super.onCreate(savedInstanceState);
        setContentView(R.layout.main);
    }

    @Override
    protectedvoid onStart(){
        super.onStart();
        // Bind to LocalService
        Intent intent =newIntent(this,LocalService.class);
        bindService(intent, mConnection,Context.BIND_AUTO_CREATE);
    }

    @Override
    protectedvoid onStop(){
        super.onStop();
        // Unbind from the service
        if(mBound){
            unbindService(mConnection);
            mBound =false;
        }
    }

    /** Called when a button is clicked (the button in the layout file attaches to
      * this method with the android:onClick attribute) */
    publicvoid onButtonClick(View v){
        if(mBound){
            // Call a method from the LocalService.
            // However, if this call were something that might hang, then this request should
            // occur in a separate thread to avoid slowing down the activity performance.
            int num = mService.getRandomNumber();
            Toast.makeText(this,"number: "+ num,Toast.LENGTH_SHORT).show();
        }
    }

    /** Defines callbacks for service binding, passed to bindService() */
    privateServiceConnection mConnection =newServiceConnection(){

        @Override
        publicvoid onServiceConnected(ComponentName className,
                IBinder service){
            // We've bound to LocalService, cast the IBinder and get LocalService instance
            LocalBinder binder =(LocalBinder) service;
            mService = binder.getService();
            mBound =true;
        }

        @Override
        publicvoid onServiceDisconnected(ComponentName arg0){
            mBound =false;
        }
    };
}
���������չʾ�˿ͻ�����ΰ�service��ʹ��ServiceConnection��ʵ�ֺ�onServiceConnected()�ص��������������IJ��֣��ṩ�˸���Ĺ��ڰ�service����Ϣ�� �ʼǣ���������Ӳ�û����ȷ�Ĵ�service�����������еĿͻ��˶�Ӧ���ں��ʵ�ʱ�����統Activity pause��ʱ�� ��Ҫ�鿴����Ĵ��룬��ApiDemos��鿴LocalService.java����LocalServiceActivity.java�ࡣ Using Messenger �������Ҫ���service�������Ľ��̽���ͨ�ţ������ʹ��Messenger��Ϊ���service�ṩ�ӿڡ�����������㲻ʹ��AIDL����ɽ��̼�ͨ�š� ������ʹ��Messenger�ļ������裺
publicclassMessengerServiceextendsService{
    /** Command to the service to display a message */
    staticfinalint MSG_SAY_HELLO =1;

    /**
     * Handler of incoming messages from clients.
     */
    classIncomingHandlerextendsHandler{
        @Override
        publicvoid handleMessage(Message msg){
            switch(msg.what){
                case MSG_SAY_HELLO:
                    Toast.makeText(getApplicationContext(),"hello!",Toast.LENGTH_SHORT).show();
                    break;
                default:
                    super.handleMessage(msg);
            }
        }
    }

    /**
     * Target we publish for clients to send messages to IncomingHandler.
     */
    finalMessenger mMessenger =newMessenger(newIncomingHandler());

    /**
     * When binding to the service, we return an interface to our messenger
     * for sending messages to the service.
     */
    @Override
    publicIBinder onBind(Intent intent){
        Toast.makeText(getApplicationContext(),"binding",Toast.LENGTH_SHORT).show();
        return mMessenger.getBinder();
    }
}
ע��Handler�����handleMessage()������servie��������ȡ��Ϣ�����һ���what��Ա������������ʲô�� �ͻ�����Ҫ���ľ��ǻ���IBinder����һ��Messenger��ʹ���������ͨ��send()������������Ϣ�������Ǹ������ӣ�����service��activity����MSG_SAY_HELLO��Ϣ��service��
publicclassActivityMessengerextendsActivity{
    /** Messenger for communicating with the service. */
    Messenger mService =null;

    /** Flag indicating whether we have called bind on the service. */
    boolean mBound;

    /**
     * Class for interacting with the main interface of the service.
     */
    privateServiceConnection mConnection =newServiceConnection(){
        publicvoid onServiceConnected(ComponentName className,IBinder service){
            // This is called when the connection with the service has been
            // established, giving us the object we can use to
            // interact with the service.  We are communicating with the
            // service using a Messenger, so here we get a client-side
            // representation of that from the raw IBinder object.
            mService =newMessenger(service);
            mBound =true;
        }

        publicvoid onServiceDisconnected(ComponentName className){
            // This is called when the connection with the service has been
            // unexpectedly disconnected -- that is, its process crashed.
            mService =null;
            mBound =false;
        }
    };

    publicvoid sayHello(View v){
        if(!mBound)return;
        // Create and send a message to the service, using a supported 'what' value
        Message msg =Message.obtain(null,MessengerService.MSG_SAY_HELLO,0,0);
        try{
            mService.send(msg);
        }catch(RemoteException e){
            e.printStackTrace();
        }
    }

    @Override
    protectedvoid onCreate(Bundle savedInstanceState){
        super.onCreate(savedInstanceState);
        setContentView(R.layout.main);
    }

    @Override
    protectedvoid onStart(){
        super.onStart();
        // Bind to the service
        bindService(newIntent(this,MessengerService.class), mConnection,
            Context.BIND_AUTO_CREATE);
    }

    @Override
    protectedvoid onStop(){
        super.onStop();
        // Unbind from the service
        if(mBound){
            unbindService(mConnection);
            mBound =false;
        }
    }
}
ע��������Ӳ�û��չʾservice��λ�Ӧ�ͻ��ˡ��������Ҫserviceȥ��Ӧ�ͻ��ˣ���ô����Ҫ�ڿͻ�����Ҳ����һ��Messenger�����ͻ��˽���onServiceConnected()�ص���ʱ������service����һ����Ϣ���������˿ͻ��˵�send()�����е�replyTo������Messenger�� ������MessengerService.java��MessengerServiceActivities.java�п�����δ���һ��˫�����Ϣ���ơ� ��Service Ӧ�ó���������ͻ��ˣ�����ͨ������bindService()��������һ��service��Androidϵͳ�����service��onBind()��������������᷵��һ��IBinder�������ںͿͻ��˽��н����� �Ĺ������첽�ġ�bindService()�ܿ�����н��������Ҳ��᷵��һ��IBinder������ͻ��ˡ�Ϊ�˽���IBinder���ͻ��˱��봴��һ��ServiceConnection��ʵ����Ȼ���������bindService()��ServiceConnection�����˹�ϵͳ���õĴ���IBinder�Ļص������� �ʼǣ�ֻ��activities��services��content providers����service������������һ��broadcast receiver��һ��service�� ���ԣ���Ҫ����Ŀͻ��˰�service������룺 1.ʵ��ServiceConnection ���ʵ�ֱ��븲д�����ص�����: onServiceConnected() ϵͳ�������������������service��onBind()�������ص�IBinder���� onServiceDisconnected() Androidϵͳ��������������ǵ�service���������ֹ�ˣ�����service�����ˣ����߱�ϵͳɱ���ˡ����ͻ��˽���ʱ����������Dz��ᱻ���õġ� 2.����bindService()������һ��ServiceConnection���� 3.��ϵͳ�������onServiceConnected()������ʱ������Կ�ʼͨ���ڽӿ��ж���ķ�����ʹ��service�� 4.Ҫ�Ͽ���service�����ӣ�����unbindService()�� ����Ŀͻ��˱����ٵ�ʱ����������service�����ǣ���Ӧ�����������service�Ľ����������activity��ͣ��ʱ��ȥ���service����Ϊ������serviceû�б�ʹ�õ�ʱ�����ͣ������������ں�ʱȥ����������������棩�� ���������չʾ�˿ͻ������ӵ�����extending the Binder class��������service�����������ľ��ǰѷ��ص�IBinder����ǿ��ת�ͳ�LocalService��ʵ����
LocalService mService;
privateServiceConnection mConnection =newServiceConnection(){
    // Called when the connection with the service is established
    publicvoid onServiceConnected(ComponentName className,IBinder service){
        // Because we have bound to an explicit
        // service that is running in our own process, we can
        // cast its IBinder to a concrete class and directly access it.
        LocalBinder binder =(LocalBinder) service;
        mService = binder.getService();
        mBound =true;
    }

    // Called when the connection with the service disconnects unexpectedly
    publicvoid onServiceDisconnected(ComponentName className){
        Log.e(TAG,"onServiceDisconnected");
        mBound =false;
    }
};
�ͻ��˿���ͨ����bindService()������һ��ServiceConnection��������һ��service��
Intent intent =newIntent(this,LocalService.class);
bindService(intent, mConnection,Context.BIND_AUTO_CREATE);
 ���ڸ���started service����Ϣ����ο�Services�ĵ���
![[����]API Guides](/Upload/SmallIMG/2013111420/2DE8BE93FE802401.png)