AnimationsDemo是android官网的一个动画使用示例。
ZoomActivity是demo中的图像缩放动画,因为这种效果比较常见,所以研究了一下代码。
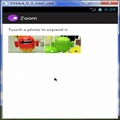
下面是效果图:

毫无疑问这是一个组合动画,translation和scale动画.实现这种动画的关键是如何确定动画的坐标和缩放比例
除了一些简单的数学计算外,该demo还利用了ImageView的fitCenter特性.稍后我们就可以看到.
在开始分析代码之前,先说一下程序的原理:
1,点击缩略图的时候同时将缩略图隐藏。
2,载入相应的大图,将大图缩小成缩略图的大小,并设置为Visible
3,大图缩小后移动到原缩略图的位置,并把它覆盖
4,被缩小的大图在该位置重新放大
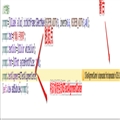
为了更清楚的表达这个过程,我将程序改动一下再运行:

浅绿色部分就是整个ImageView的大小。明白这一点很重要。
原理明白了就可以开始分析代码,先来的是程序的布局:
<FrameLayout xmlns:android="http://schemas.android.com/apk/res/android"
             android:id="@+id/container"
             android:layout_width="match_parent"
             android:layout_height="match_parent">

    <LinearLayout
        android:layout_width="match_parent"
        android:layout_height="wrap_content"
        android:orientation="vertical"
        android:padding="16dp">

        <TextView
            style="?android:textAppearanceSmall"
            android:layout_width="wrap_content"
            android:layout_height="wrap_content"
            android:text="@string/message_zoom_touch_expand"/>

        <LinearLayout
            android:layout_width="wrap_content"
            android:layout_height="wrap_content"
            android:layout_marginTop="16dp"
            android:orientation="horizontal">

            <ImageView
                android:id="@+id/thumb_button_1"
                android:layout_width="100dp"
                android:layout_height="75dp"
                android:layout_marginRight="1dp"
                android:src="@drawable/thumb1"
                android:scaleType="centerCrop"
                android:contentDescription="@string/description_image_1"/>

            <ImageView
                android:id="@+id/thumb_button_2"
                android:layout_width="100dp"
                android:layout_height="75dp"
                android:src="@drawable/thumb2"
                android:scaleType="centerCrop"
                android:contentDescription="@string/description_image_2"/>

        </LinearLayout>

    </LinearLayout>

    <ImageView
        android:id="@+id/expanded_image"
        android:layout_width="match_parent"
        android:layout_height="match_parent"
        android:visibility="invisible"
        android:contentDescription="@string/description_zoom_touch_close"/>

</FrameLayout>
布局本身并没有什么值得讨论的地方,唯一需要注意的是布局中的三个ImageView对象。
两个用于放置缩略图,亦即是上图中的两个小图,最下面的ImageView就是我们主要操作的对象。
这样做的好处是可以节省程序的使用内存,防止OOM的发生。
大概了解一下布局后我们就可以来分析程序的逻辑,程序中所有的动画逻辑都在下面的函数中完成
private void zoomImageFromThumb(final View thumbView, int imageResId)
下面是函数的其中一段代码:
//用于计算translation动画开始的坐标
        final Rect startBounds = new Rect();
        final Rect finalBounds = new Rect();
        final Point globalOffset = new Point();

        //获取thumbView在屏幕中的偏移量
        thumbView.getGlobalVisibleRect(startBounds);
        //获取container在屏幕中的偏移量并将偏移量记录到globalOffset中
        findViewById(R.id.container).getGlobalVisibleRect(finalBounds, globalOffset);

        //将屏幕坐标减去ActionBar+StatusBar的高度
        startBounds.offset(-globalOffset.x, -globalOffset.y);
        finalBounds.offset(-globalOffset.x, -globalOffset.y);
对getGlobalVisibleRect函数不明白的可以参考下面的文章
GetGlobalVisibleRect和getLocalVisibleRect
上面这段代码的主要作用就是获取缩略图的坐标,因为动画就是从这个坐标开始进行。
startBounds和finalBounds调用offset方法的作用是将坐标转换为以Activity左上角为原点的坐标
坐标计算好后就开始计算缩放比率,下面是函数的另一段代码:
float startScale;
        if ((float) finalBounds.width() / finalBounds.height()
                > (float) startBounds.width() / startBounds.height())
        {
            // Extend start bounds horizontally
            startScale = (float) startBounds.height() / finalBounds.height();
            System.out.println("startScale1:"+startScale);
            float startWidth = startScale * finalBounds.width();
            float deltaWidth = (startWidth - startBounds.width()) / 2;
            System.out.println("startWidth:"+startWidth);
            System.out.println("deltaWidth:"+deltaWidth);
            startBounds.left -= deltaWidth;
            startBounds.right += deltaWidth;

        } else
        {
            //计算缩放量比例
            startScale = (float) startBounds.width() / finalBounds.width();
            //计算expanded_image缩小后的大小
            float startHeight = startScale * finalBounds.height();
            //计算expanded_image上下空间的偏移距离
            float deltaHeight = (startHeight - startBounds.height()) / 2;
            //开始移动动画前的位置
            startBounds.top -= deltaHeight;
            startBounds.bottom += deltaHeight;

        }
根据下面的图在来分析代码

我们都知道绿色部分才是ImageView的覆盖位置,所以位移开始的地方是绿色部分的左上角,
startBounds和finalBounds的坐标实际上并不包含上下两个绿色矩形,因此我们要纠正之前获取的坐标
下面几行代码的作用就是用于纠正坐标和计算缩放比例
startScale = (float) startBounds.width() / finalBounds.width();
            //计算expanded_image缩小后的大小
            float startHeight = startScale * finalBounds.height();
            //计算expanded_image上下空间的偏移距离
            float deltaHeight = (startHeight - startBounds.height()) / 2;
            //开始移动动画前的位置
            startBounds.top -= deltaHeight;
            startBounds.bottom += deltaHeight;
startHeight是缩放后整个绿色部分的高度,deltaHeight就是上下两个矩形的各自高度,它们的值相等。
startBounds.top减去deltaHeight的高度就可以将startBounds的坐标向上移动。因为原点在左上角,要向上移动就要用减号。
startBounds.bottom的原理相同。
准备工作都做好后,动画开始播放:
        expandedImageView.setVisibility(View.VISIBLE);
        expandedImageView.setPivotX(0f);
        expandedImageView.setPivotY(0f);

        AnimatorSet set = new AnimatorSet();
        set
                .play(ObjectAnimator.ofFloat(expandedImageView, View.X, startBounds.left,
                        finalBounds.left))
                .with(ObjectAnimator.ofFloat(expandedImageView, View.Y, startBounds.top,
                        finalBounds.top))
                .with(ObjectAnimator.ofFloat(expandedImageView, View.SCALE_X, startScale, 1f))
                .with(ObjectAnimator.ofFloat(expandedImageView, View.SCALE_Y, startScale, 1f));
        set.setDuration(mShortAnimationDuration);
        set.setInterpolator(new DecelerateInterpolator());
        set.start();
正如我们前面说的需要将大图设置为显示:expandedImageView.setVisibility(View.VISIBLE);
下面的代码将中心点移动到expandedImageView的左上角
expandedImageView.setPivotX(0f);

expandedImageView.setPivotY(0f);
剩下的代码基本上就是如何使用Property Animation,不熟悉的可参考使用属性动画 ― Property Animation
Demo的完整代码:
package com.example.android.animationsdemo;

import android.animation.Animator;
import android.animation.AnimatorListenerAdapter;
import android.animation.AnimatorSet;
import android.animation.ObjectAnimator;
import android.content.Intent;
import android.graphics.Point;
import android.graphics.Rect;
import android.os.Bundle;
import android.support.v4.app.FragmentActivity;
import android.support.v4.app.NavUtils;
import android.view.MenuItem;
import android.view.View;
import android.view.animation.DecelerateInterpolator;
import android.widget.ImageView;


public class ZoomActivity extends FragmentActivity
{
    private Animator mCurrentAnimator;

    private int mShortAnimationDuration;

    @Override
    protected void onCreate(Bundle savedInstanceState)
    {
        super.onCreate(savedInstanceState);
        setContentView(R.layout.activity_zoom);

        final View thumb1View = findViewById(R.id.thumb_button_1);
        thumb1View.setOnClickListener(new View.OnClickListener()
        {
            @Override
            public void onClick(View view)
            {
                zoomImageFromThumb(thumb1View, R.drawable.image1);
            }
        });

        final View thumb2View = findViewById(R.id.thumb_button_2);
        thumb2View.setOnClickListener(new View.OnClickListener()
        {
            @Override
            public void onClick(View view)
            {
                zoomImageFromThumb(thumb2View, R.drawable.image2);
            }
        });

        // Retrieve and cache the system's default "short" animation time.
        mShortAnimationDuration = getResources().getInteger(android.R.integer.config_shortAnimTime);
    }

    @Override
    public boolean onOptionsItemSelected(MenuItem item)
    {
        switch (item.getItemId())
        {
            case android.R.id.home:
                // Navigate "up" the demo structure to the launchpad activity.
                // See http://developer.android.com/design/patterns/navigation.html for more.
                NavUtils.navigateUpTo(this, new Intent(this, MainActivity.class));
                return true;
        }

        return super.onOptionsItemSelected(item);
    }

    private void zoomImageFromThumb(final View thumbView, int imageResId)
    {
        // If there's an animation in progress, cancel it immediately and proceed with this one.
        if (mCurrentAnimator != null)
        {
            mCurrentAnimator.cancel();
        }

        // Load the high-resolution "zoomed-in" image.
        final ImageView expandedImageView = (ImageView) findViewById(R.id.expanded_image);
        expandedImageView.setImageResource(imageResId);


        //用于计算translation动画开始的坐标
        final Rect startBounds = new Rect();
        final Rect finalBounds = new Rect();
        final Point globalOffset = new Point();

        //获取thumbView在屏幕中的偏移量
        thumbView.getGlobalVisibleRect(startBounds);
        //获取container在屏幕中的偏移量并将偏移量记录到globalOffset中
        findViewById(R.id.container).getGlobalVisibleRect(finalBounds, globalOffset);

        //将屏幕坐标减去ActionBar+StatusBar的高度
        startBounds.offset(-globalOffset.x, -globalOffset.y);
        finalBounds.offset(-globalOffset.x, -globalOffset.y);


        float startScale;
        if ((float) finalBounds.width() / finalBounds.height()
                > (float) startBounds.width() / startBounds.height())
        {
            // Extend start bounds horizontally
            startScale = (float) startBounds.height() / finalBounds.height();
            System.out.println("startScale1:"+startScale);
            float startWidth = startScale * finalBounds.width();
            float deltaWidth = (startWidth - startBounds.width()) / 2;
            System.out.println("startWidth:"+startWidth);
            System.out.println("deltaWidth:"+deltaWidth);
            startBounds.left -= deltaWidth;
            startBounds.right += deltaWidth;

        } else
        {
            //计算缩放量比例
            startScale = (float) startBounds.width() / finalBounds.width();
            //计算expanded_image缩小后的大小
            float startHeight = startScale * finalBounds.height();
            //计算expanded_image上下空间的偏移距离
            float deltaHeight = (startHeight - startBounds.height()) / 2;
            //开始移动动画前的位置
            startBounds.top -= deltaHeight;
            startBounds.bottom += deltaHeight;

        }
        // Hide the thumbnail and show the zoomed-in view. When the animation begins,
        // it will position the zoomed-in view in the place of the thumbnail.
        thumbView.setAlpha(0f);
        expandedImageView.setVisibility(View.VISIBLE);

        // Set the pivot point for SCALE_X and SCALE_Y transformations to the top-left corner of
        // the zoomed-in view (the default is the center of the view).
        expandedImageView.setPivotX(0f);
        expandedImageView.setPivotY(0f);

        // Construct and run the parallel animation of the four translation and scale properties
        // (X, Y, SCALE_X, and SCALE_Y).
        AnimatorSet set = new AnimatorSet();
        set
                .play(ObjectAnimator.ofFloat(expandedImageView, View.X, startBounds.left,
                        finalBounds.left))
                .with(ObjectAnimator.ofFloat(expandedImageView, View.Y, startBounds.top,
                        finalBounds.top))
                .with(ObjectAnimator.ofFloat(expandedImageView, View.SCALE_X, startScale, 1f))
                .with(ObjectAnimator.ofFloat(expandedImageView, View.SCALE_Y, startScale, 1f));
        set.setDuration(mShortAnimationDuration);
        set.setInterpolator(new DecelerateInterpolator());
        set.addListener(new AnimatorListenerAdapter()
        {
            @Override
            public void onAnimationEnd(Animator animation)
            {
                mCurrentAnimator = null;
            }

            @Override
            public void onAnimationCancel(Animator animation)
            {
                mCurrentAnimator = null;
            }
        });
        set.start();
        mCurrentAnimator = set;

        // Upon clicking the zoomed-in image, it should zoom back down to the original bounds
        // and show the thumbnail instead of the expanded image.
        final float startScaleFinal = startScale;
        expandedImageView.setOnClickListener(new View.OnClickListener()
        {
            @Override
            public void onClick(View view)
            {
                if (mCurrentAnimator != null)
                {
                    mCurrentAnimator.cancel();
                }

                // Animate the four positioning/sizing properties in parallel, back to their
                // original values.
                AnimatorSet set = new AnimatorSet();
                set.play(ObjectAnimator.ofFloat(expandedImageView, View.X, startBounds.left))
                    .with(ObjectAnimator.ofFloat(expandedImageView, View.Y, startBounds.top))
                    .with(ObjectAnimator.ofFloat(expandedImageView, View.SCALE_X, startScaleFinal))
                    .with(ObjectAnimator.ofFloat(expandedImageView, View.SCALE_Y, startScaleFinal));
                set.setDuration(mShortAnimationDuration);
                set.setInterpolator(new DecelerateInterpolator());
                set.addListener(new AnimatorListenerAdapter()
                {
                    @Override
                    public void onAnimationEnd(Animator animation)
                    {
                        thumbView.setAlpha(1f);
                        expandedImageView.setVisibility(View.GONE);
                        mCurrentAnimator = null;
                    }

                    @Override
                    public void onAnimationCancel(Animator animation)
                    {
                        thumbView.setAlpha(1f);
                        expandedImageView.setVisibility(View.GONE);
                        mCurrentAnimator = null;
                    }
                });
                set.start();
                mCurrentAnimator = set;
            }
        });
    }
}